Arduino LED Chaser, Knight rider & Random flasher
LED Chaser
An LED chaser has an output of a Ring counter circuit. Where the high state at an output pin shift from one pin ( a bit) to another, having only one output pin is high at a time. Thus the output seems as a running light which circles continuously.

Code
int i;
int led[]={2,3,4,5,6,8,9,10,11};
void setup() {
for(i=0;i<9;i++){
  pinMode(led[i],OUTPUT);
}
}

void loop() {

for(i=0;i<9;i++){
  digitalWrite(led[i],HIGH);
  delay(100);
  digitalWrite(led[i],LOW);
}
}
LED Knight Rider
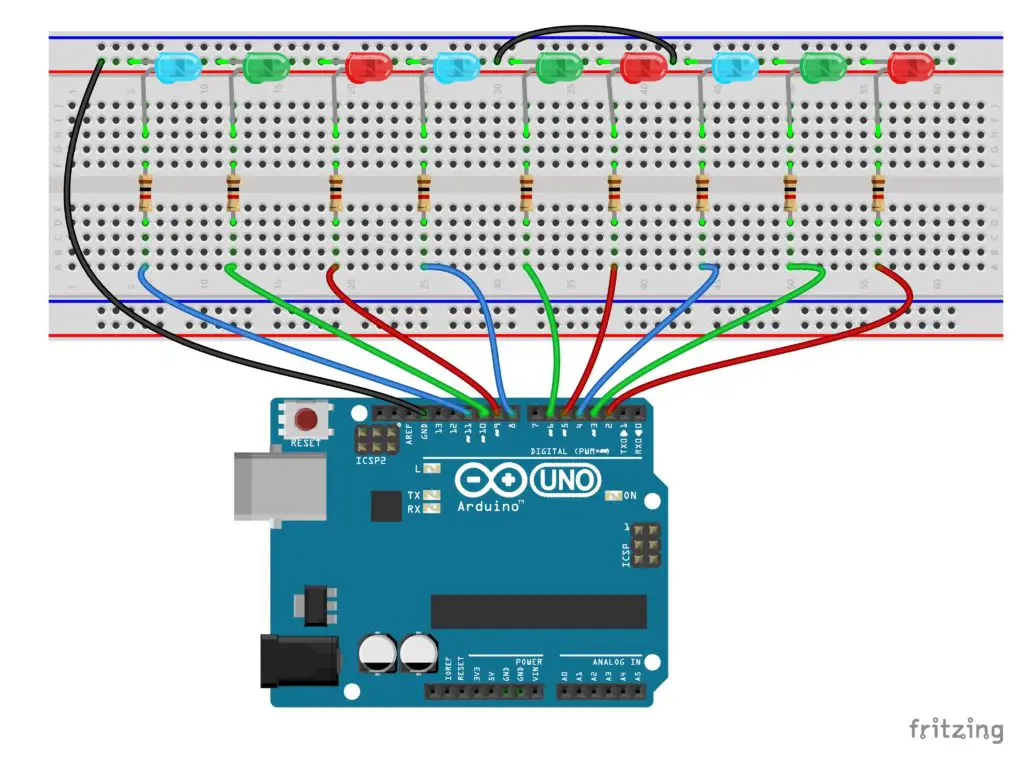
The circuit of the knight rider with Arduino is same as for the LED chaser or Ring counter. The only difference instead of rotating, the Light moves to and fro. That is the ON state of the LED shifts from one end to another and shift back’s to the starting end in the opposite direction.
Code
int i;
int led[]={2,3,4,5,6,8,9,10,11};
void setup()
{
for(i=0;i<=8;i++){
  pinMode(led[i],OUTPUT);
}
}
void loop() {
for(i=0;i<=8;i++){
  digitalWrite(led[i],HIGH);
  delay(100);
  digitalWrite(led[i],LOW);
}
for(i=8;i>=0;i--){
  digitalWrite(led[i],HIGH);
  delay(100);
  digitalWrite(led[i],LOW);
}
}
The program has two separate ” for ” loops to shift in both directions.The first for loop increments the variable “i”, shift the array (led array [] = {2, 3, 4, 5, 6, 8, 9, 10, 11}) from 0 to 8. And the second for loop decrements the “i” to shift back the array from 8 to 0.
Random led flasher
In this first code, we are using the inbuilt random( ) function in the arduino language. The random( ) function generates pseudo-random numbers ranging from to 0 to 9. For random values of ‘i’, the corresponding LEDs in the array ON and OFF with a time delay of 50ms. This creates a random flashing of LEDs. The visual effect can be varied with the rate of LED transition, this can be adjusted by changing the time delay.
Code
int i;
int ledarray[] = {2, 3, 4, 5, 6, 8, 9, 10, 11};

void setup()
{
  for (i = 0; i < 9; i++)
  {
    pinMode (ledarray[i], OUTPUT);
  }
}
void loop() {
  i = random(9);
  digitalWrite (ledarray[i], HIGH);
   delay(50);
  digitalWrite (ledarray[i], LOW);
}
The code given above is for a 10 LED random flasher. Here also the circuit is same as for the above chaser and knight rider. Because for all the above codes, the pin number sequence in the array is same for the given circuit arrangement.
4 Bit random LED blinker using LFSR code
Here we are using a program implementation of the LFSR for the generation of the pseudorandom numbers or pseudo-noise sequences.
A linear-feedback shift register (LFSR) is a shift register whose linear function of the previous state takes as input. That is the shift register rotates from left to right. And the XOR gate (exclusive-or (XOR) is most commonly used) output provides feedback to the first bit of the register, by taking last two bits as XOR gate inputs.
An LFSR can generate all the possible sequences that can be generated by the register except the “0000” state.

Code
int a,b,i,x,y;
int array[]= {2,3,4,5};
int arraylfsr[4];
void setup()
{
for(i=0;i<4;i++)
{
pinMode(array[i], OUTPUT);
arraylfsr[i]=1;
}
}

void loop()
{
for(i=0;i<4;i++){
  if(arraylfsr[i]==1){
  digitalWrite(array[i], HIGH);
  }
else{
  digitalWrite(array[i], LOW);
}
}
delay(300);
a=arraylfsr[3]; // a= last bit value
b=arraylfsr[2]; // b = second last bit value
if (a==b)
{
  y=0; // XOR output=0 for 2 same input bits
}
if (a!=b)
{
  y=1; // XOR output=1 for 2 different input bits
}
for(i=2;i>=0;i--){
  arraylfsr[i+1]=arraylfsr[i]; //shift bits from left to right
}
arraylfsr[0]=y; //  XOR output provides feedback to the first lsfr bit
}
This program has two arrays, “array[]= {2,3,4,5}” and “arraylfsr[4]”. The “array[]” has the corresponding pins of Arduino connected to the LEDs and the “arraylfsr[4]” performs the LSFR function. The corresponding bit states in the “arraylfsr[4]” switches the output states of the pins listed in the “array[]” by the “for” loop in the program shown below,
for(i=0;i<4;i++){if
(arraylfsr[i]==1)
{
  digitalWrite(array[i], HIGH);
  }
else{
  digitalWrite(array[i], LOW);
}}


6 led cheser code ples
Replace lines in the chaser code,
int ledarray[] = {2, 3, 4, 5, 6, 7};
Connect LEDs to the 6 digital pins declared in the array.
Change condition from i<9 to i < 6. for (i = 0; i < 6; i++)
Thanks