Arduino Push Button Counter Code LCD Circuit and working
A counter is a device that counts the number of times when a particular event occurs.
Here we count the number of times the push switch has been pressed. The Arduino detects a transition of input from a LOW state to the HIGH state during switch press; that is the value of counting variable increments for a positive edge triggering.
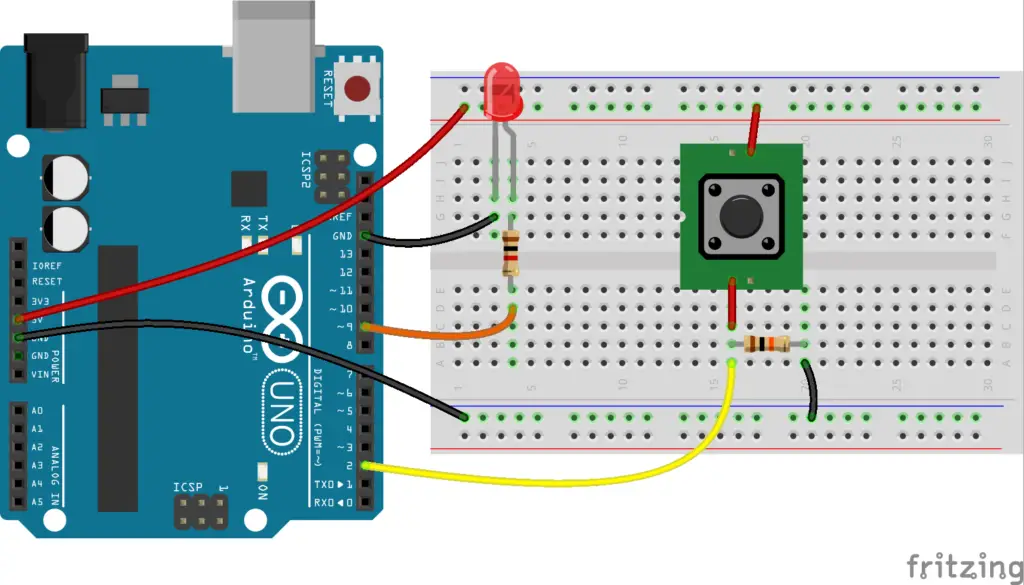
In the circuit, the push switch is connected to a digital pin of the Arduino; here at pin 9. When the push switch has pressed the LED ON for half a seconds and then OFF, it is provided just for an indication that the switch press has been detected or the value has been incremented by one.
The counter is designed for a positive edge trigger, hence it only increments the count variable on a positive edge irrespective of how long the switch is held ON. In order to do that we have added a variable called “prestate”. The counter value increments only when two conditions are satisfied, that is the input state is high and the value of prestate is 0. Once the switch is pressed, along with incrementing and flashing the LED the value of prestate also set to 1; as you can see in the code area inside the if condition.
As long as the switch is held ON the prestate remains 1 and it sets to 0 only when the switch is released. So the code allows us to increment the variable only for positive edges of the input. This logic is similar to a toggle switch which ON and OFF the output for alternative switch ON of the same input; usually a toggle switch responds for a positive edge trigger.
Arduino counter code
const int buttonPin = 2;     // the number of the pushbutton pin
const int ledPin =  9;      // the number of the LED pin

// variables will change:
int buttonState = 0;         // variable for reading the pushbutton status
int count_value =0;
int prestate =0;
void setup() {
  // initialize the LED pin as an output:
  pinMode(ledPin, OUTPUT);
  // initialize the pushbutton pin as an input:
  pinMode(buttonPin, INPUT);
  Serial.begin(9600);
}

void loop() {
  // read the state of the pushbutton value:
  buttonState = digitalRead(buttonPin);

  // check if the pushbutton is pressed. If it is, then the buttonState is HIGH:
  if (buttonState == HIGH && prestate == 0) {
    count_value++;
    Serial.println(count_value);
    // turn LED on
    digitalWrite(ledPin, HIGH);
    delay(100);
    // turn LED off
    digitalWrite(ledPin, LOW);

    prestate = 1;
  } else if(buttonState == LOW) {
    prestate = 0;
  }
}
If we use code as given below, without a variable to detect the previous state then the counter value keeps incrementing as long as the switch is held ON.
void loop() {
  buttonState = digitalRead(buttonPin);
  if (buttonState == HIGH) {
    count_value++;
    delay(100);
  }
}
Push button up down counter Arduino
The arrangement is similar to above, the only difference is an additional input switch and a few lines of code to add the decrement function to the counter. Here, one switch press increments the value whereas the seconds switch decrements the value.
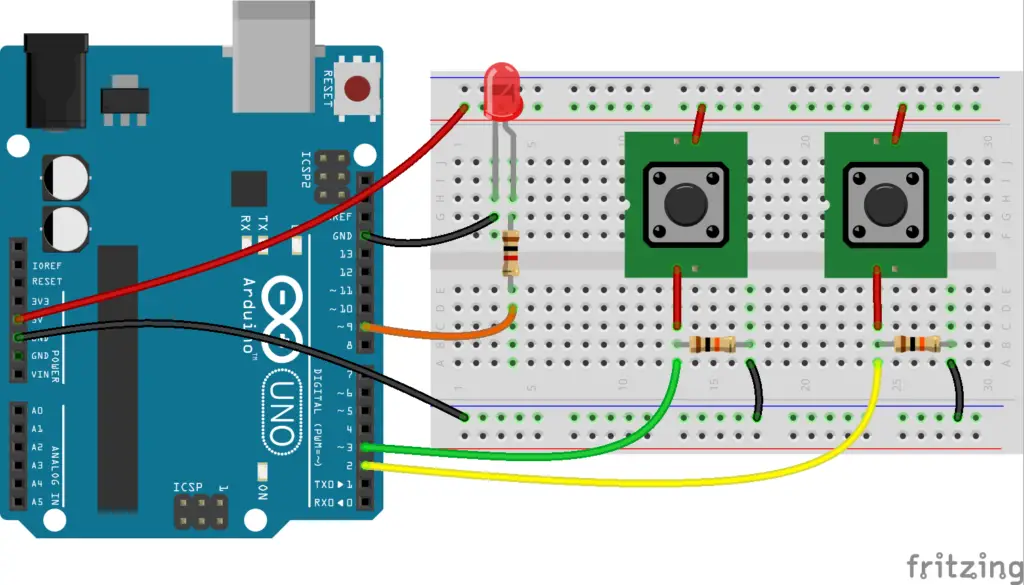
Here in the code, when we press the first switch the first “if” condition becomes true as the input at pin2 is high and the prestate is 0. Once the switch is held on the variable prestate is 1 and stops further counting. Even if we press the second switch it doesn’t decrement the variable as the prestate is still 1 and its value doesn’t change to 0 unless both switches are released.
So in order to increment or decrement both the inputs must be at a low state before applying the high state at any of the inputs.
Code for increment and decrement counter
const int buttonPin1 = 2, buttonPin2 = 3;  // the number of the pushbutton pins
const int ledPin =  13;      // the number of the LED pin

// variables will change:
int button1_State = 0, button2_State = 0;  // variable for reading the pushbuttons status
int count_value =0;
int prestate =0;
void setup() {
  // initialize the LED pin as an output
  //LED flashes during both increment and decrement of counter
  pinMode(ledPin, OUTPUT);
  // initialize the pushbutton pin as an input:
  pinMode(buttonPin1, INPUT);
  pinMode(buttonPin2, INPUT);
  Serial.begin(9600);
}

void loop() {
  // read the state of the pushbutton
  button1_State = digitalRead(buttonPin1);
  button2_State = digitalRead(buttonPin2);
  // counter increment if the pushbutton 1 is pressed.
  if (button1_State == HIGH && prestate == 0) {
    count_value++;
      Serial.println(count_value);
    // turn LED on
    digitalWrite(ledPin, HIGH);
    delay(200);
     // turn LED off
    digitalWrite(ledPin, LOW);
    prestate = 1;
  }
// counter decrement if the pushbutton 2 is pressed.
  else if (button2_State == HIGH && prestate == 0) {
    count_value--;
      Serial.println(count_value);
    // turn LED on
    digitalWrite(ledPin, HIGH);
    delay(100);
     // turn LED off
    digitalWrite(ledPin, LOW);
    prestate = 1;
  }
 else if(button1_State == LOW && button2_State == LOW) {
    prestate = 0;
  }
}
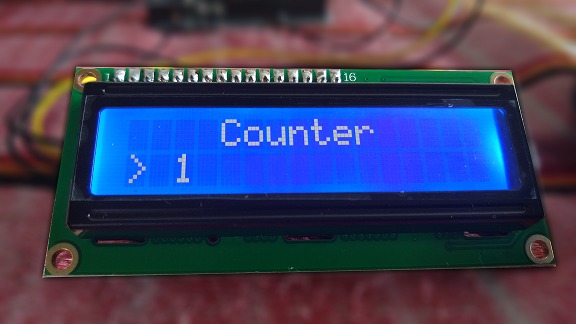
Up Down Counter with LCD display
In the above codes, the counter value was displayed on the serial monitor, the same can displayed on an LCD display.
The below code is for an LCD interface with the Arduino using an I2C module, refer to the Arduino LCD interface to use an LCD display with or without an I2C adapter.

Counter LCD display Code
#include <LiquidCrystal_I2C.h>
const int buttonPin1 = 2, buttonPin2 = 3;
int button1_State = 0, button2_State = 0;
int count_value =0;
int prestate =0;
LiquidCrystal_I2C lcd(0x27,16,2);
void setup() {
  // initialize the pushbutton pin as an input:
  pinMode(buttonPin1, INPUT);
  pinMode(buttonPin2, INPUT);
  lcd.init();
  lcd.backlight();
  lcd.setCursor(4,0);
  lcd.print("Counter");
  lcd.setCursor(2,1);
  lcd.print(count_value);
}

void loop() {
  // read the state of the pushbutton value:
  button1_State = digitalRead(buttonPin1);
  button2_State = digitalRead(buttonPin2);
  // check if the pushbutton is pressed. If it is, the buttonState is HIGH:
  if (button1_State == HIGH && prestate == 0) {
    count_value++;
  lcd.setCursor(0,1);
  lcd.print("> ");
  lcd.print(count_value);
  lcd.print(" ");
    prestate = 1;
  }
//decrement
  else if (button2_State == HIGH && prestate == 0) {
    count_value--;
  lcd.setCursor(0,1);
  lcd.print("< ");
  lcd.print(count_value);
  lcd.print(" ");
   prestate = 1;
  }
 else if(button1_State == LOW && button2_State == LOW) {
    prestate = 0;
  }
}
The code initializes the LiquidCrystal_I2C library with the address of the LCD and the size (16×2) and then sets the cursor position to display the text “Counter” and count_value on the first line of the LCD.
In the setup() function, the buttonPin1 and buttonPin2 are declared as inputs and the initial value of count_value is set to 0. The LCD is initialized and the backlight is turned on.
If button 1 is pressed and the previous state is 0, the count_value is incremented and the new value is displayed on the second line of the LCD with a “> ” symbol. If button 2 is pressed and the previous state is 0, the count_value is decremented and the new value is displayed on the second line of the LCD with a “< ” symbol. If both buttons are not pressed, the previous state is set to 0.
This code will continuously check the state of the buttons and update the count_value and display it on the LCD until the power is disconnected or a new program is uploaded.
Great it is working ! how to make more than 9 or unlimited counting ??
It counts more than 9 and up to a maximum an int can store -32,768 to 32,767.
Your code works fine but the diagram doesn’t match the variables. LED is pin 9 in the diagram and 13 in the code.
The previous code was for the default LED at pin 13 which is inbuilt on the board. Now it has been changed to 9 as in the circuit.
Thank you for pointing it out.
I am working with NodeMCU and I need to connect 3 Switches with 3 LED and when I press one switch one LED to be ON rest two to be off If I ON 2nd rest two to be off please help I am trying since 6Hrs
Sir may you help me with my project dealing with lcd and infrared remote volume up and down as button up and down for counter
Please explain more about your project?
hello sir,
Can you please tell the name of the switch and where to buy?
It’s a very common switch that you can find in any electronics shop or online site, just search for a single-pole push button switch, or SPST push switch, or a momentary push switch.
I used this code to cycle through flash patterns of an 8×5 led matrix. Each button press started a different flash pattern using the “switch / case” function.
i.e. “switch (count_value){ case 1: RowsUpDown; break; }” Because there is a limited number of flash patterns I was using, I also wanted to limit the count_value of the push button. I modified the code so when the count_value reaches a certain number it resets to 0 and starts over again. I was able to do this by adding a nested “if” statement within the first “if ” statement. Example:
//button counter code
buttonState = digitalRead(buttonPin);
if (buttonState == HIGH && prestate == 0) {
if (count_value <5){
count_value++;
prestate = 1;
}
else{
count_value = 0;
}
}
else if(buttonState == LOW) {
prestate = 0;
}
Worked like a charm. Thank you for this code and a better understanding of positive edge triggers. 🙂
how to store button counter result to sd card?. im using esp32 and rtc ds1307 as input with the button in realtime.
google translate eng-german Push button up down counter Arduino
Hi,
question
I’m not that good at programming c. tried to change the sketch with 2 buttons so that the 3 button
sets the counter to zero. didn’t manage.
please help what I should change in the code so that high at input 4 counter is 0. thanks
—
hi,
frage
bin nicht so gut im c programmieren . habe versucht den sketch mit 2 buttons so zu ändern das der 3 button
den zähler auf null setzt. habe nicht geschaft.
bitte um hilfe was ich am code ändern soll damit High am eingang 4 zähler 0 ist. DANKE
I think your requirement is to add a 3rd switch at pin 4, which reset the count value to zero when it is pressed (or high state at input pin 4). Then try the below code after connecting the 3rd switch to pin 4 as similar to push buttons 1 and 2 in the circuit.
Feel free to ask if you have any errors or doubts in the code/circuit.
Hi,
After seeing this as i am a newbie to this i wanted your opinion on the following task,
I would like to build a switch tester and counter for a cycle of 5000 times.
Hoping the following conditions should also be met,
1) Each time the switch is pressed it should be registered as ‘1’ count and so on.
2) Each time the switch is pressed it should record whether the output is in ON or OFF mode.
3) If the switch is pressed and the output is not there, the instrument needs to record it while still carrying on for 5000 cycles.
4) Hoping the data recording could be done via arduino or rasberry pi.
Hoping you can help me regarding this task.
So your requirement is, you will press the switch 5000 times, and each time you have to register the switch count along with recording whether the switch output is ON/OFF, Right?.
I think you can declare an array to register the output state by taking count value as respective element position in the array. Also, you have to use an additional switch for the counter and the output of the testing switch needs to be connected to a digital pin for reading its state. Or if the switch press is periodic, a timeout option can be also used to register the output of the testing switch by counting at a regular interval of time.
Arduino or any other microcontroller will be enough.
I am working on a bop it game for my engineering class. My game has 4 game levels and then a start and finish level. After completing each game level you are given a character displayed by the lcd. At the end of the game you are told all the characters.
The start level is supposed to tell you to press the start button to begin the game entering level 1. Level 1 is supposed to make you press the button and when you do it will give you a character moving on to the next stage but if you don’t you’re given a message telling you what to do. Level 2 is supposed to make you cover the photoresistor and when you do it will give you a character moving on to the next stage but if you don’t you’re given a message telling you what to do. Level 3 is supposed to make you be within 5 in of the distance sensor and when you do it will give you a character moving on to the next stage but if you don’t you’re given a message telling you what to do. Level 4 is supposed to make you be within 5-10 in of the distance sensor when you do it will give you a character moving on to the next stage but if you don’t you’re given a message telling you what to do. Endgame is supposed to tell you the characters you received from the game.
As this is a game I want to make sure these levels run in order, currently they run all at the same time, please help me if you can.
Try this,
Just create a variable say “LEVEL”. Set the the value as LEVEL = 1,LEVEL = 2,… as the level progress. Add condition check with “if condition” or “while loop” like,
if(LEVEL == 1 ){…..} or
while(LEVEL == 1)
So only a code block for each game level will be run at a time.
Would this code also work for FSR sensors?
Yes, you can use an FSR (Force Sensitive Resistor) sensor, if you are trying to count the number of times a particular level of force threshold occured. For a digital output from the sensor the same code can be used and for an analog output use like; value > threshold as HIGH state and value < threshold as LOW state.
hello, I am currently doing a project for basically this exact counter with code based off of this article. the trouble i’m having is i need to terminate or break out of the counting loop once my counter reaches zero.
if (button2_State == HIGH && prestate == 0 && count_value>=0)
you can add an AND operation in the if condition (count_value>=0) to stop counting once reached zero.
can you make a counter without a button, pls
Do you mean counter with just delay?
This is very useful. It answered my query about incrementing using tactile switch (push button). I was confused at first because it contained lcd.print() commands and so on in the if – else if. Analyzing carefully, this is actually pretty straightforward. Thank you for this.
The circuit works perfectly. I am building a counter that counts the number of times a person taps their foot while sitting. I implemented your method and it works fantastically well with what i am aiming for. Only thing left is a pressure sensor that can properly measure the foot taps, do you have any recommendations? Also, thank you for the counter.
You’re welcome! Happy to know this project is being used for other applications.
You are on the right track, just calibrate the pressure sensor effectively, in such a way that only taps exceeding a predefined threshold are registered and counted.
thank you. what change do i need to add in the code to make it so that no matter how long the plate is pressed, it only adds 1 once?
i am currently doing a project based on this very counter. the only difference is im using a toggle switch(not by choice, i would personally use a push switch but i was asked to use a toggle switch) and every time i press it, the counter rapidly starts adding 1 non stop until the state of switch is changed. i want this to be changed and instead, i want 1 to be added only once every time the switch is pressed, what changed should be done to the code?
any idea?
I think you can use the interrupt button and you can then specify there that it will count only while the signal is FALLING, then debounce the terminal for a time, then count++.