Keypad Interfacing with Arduino 4×4, 4×3 with LCD connection and code
A Matrix Keypad is a very useful module for embedded systems and a variety of projects. This tutorial briefly explains the interface of 4×3 and 4×4 keypads with Arduino and few programs using keypad library, including code for 16×2 LCD display.
4×4 and 4×3 keypads are commonly used matrix membrane keypads. 4×4 keypad has an additional column with A, B, C, D buttons, this is useful while additional switches are required for controls or functions like menu, navigation, Enter, Cancel, etc.
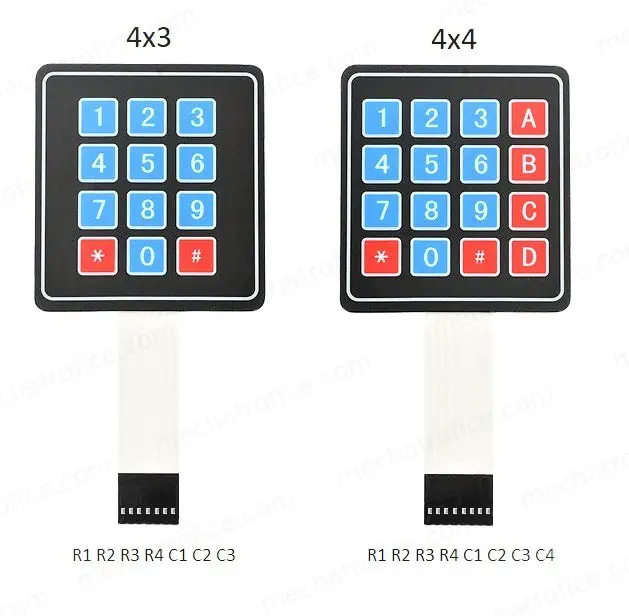
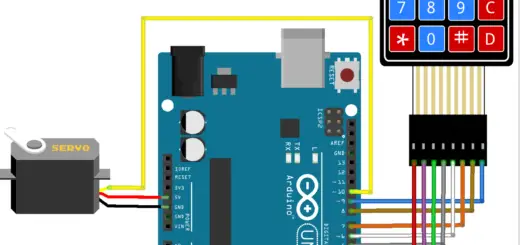
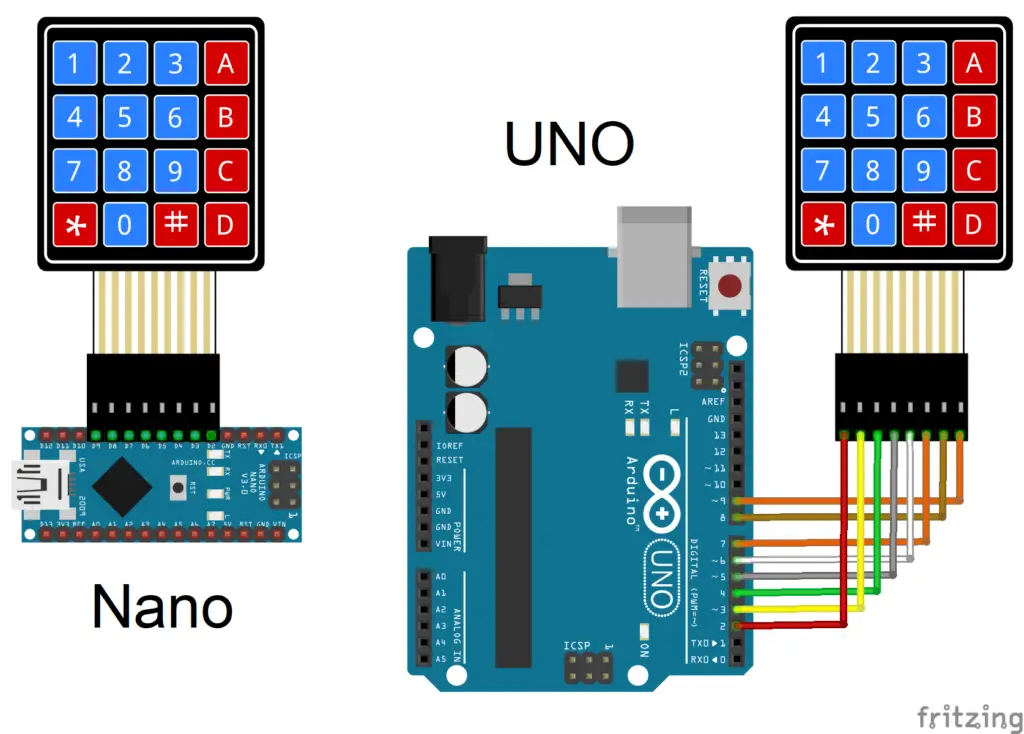
A 4×4 keypad is a 16-button keypad consists of a combination of four rows and four columns indicated as R1, R2, R3, R4 for rows and C1, C2, C3, C4 for columns. Whereas a 4×3 is a 12-button keypad with 4 rows and 3 columns. The number of keypad buttons are Rn x Cn and number of pin connections is Rn + Cn; Rn – n number of rows, Cn – n number of columns. Hence 4×4 keypad has 8 pins and 4×3 has 7 pins. Any digital I/O pin of the Arduino can be used for connection, the pins used in the here circuits is listed in the below table,
Keypad Arduino connection
| 4×3 Keypad | 4×4 Keypad | Arduino Pin |
| R1 | R1 | 2 |
| R2 | R2 | 3 |
| R3 | R3 | 4 |
| R4 | R4 | 5 |
| C1 | C1 | 6 |
| C2 | C2 | 7 |
| C3 | C3 | 8 |
| C4 | 9 |
A 4×4 keypad comes with an 8-pin female connector, so it can be plugged directly to Arduino pro mini, nano or similar boards that has male header pins. Also, using an 8-pin male header it can be plugged to breadboards or boards that has suitable female headers.
The code shown below is using Keypad Library for Arduino by Authors: Mark Stanley, Alexander Brevig; This is a simple and widely used keypad library for Arduino, follow the link to download and install. Or import the same from Arduino IDE >Sketch >Include Library>Manage Libraries, then search for the Keypad and install it.
4×4 keypad display on serial monitor
4×3 keypad Arduino code – Serial monitor
//Code for a 4x3 Keypad
#include <Keypad.h>
const byte ROWS = 4; //four rows
const byte COLS = 3; //three columns
char keys[ROWS][COLS] = {
  {'1', '2', '3'},
  {'4', '5', '6'},
  {'7', '8', '9'},
  {'*', '0', '#'}
};
byte rowPins[ROWS] = {2, 3, 4, 5};
byte colPins[COLS] = {6, 7, 8};

Keypad keypad = Keypad( makeKeymap(keys), rowPins, colPins, ROWS, COLS );

void setup() {
  Serial.begin(9600);
}

void loop() {
  char key = keypad.getKey();
  if (key) {
    Serial.print(key);
    Serial.print(" ");
  }
}
As you can see the difference in the codes for 4×3 and 4×4 keypads, it is simple and easy to change the code to use with both keypads. Just change the column number, add an additional pin, declare values for new column.
4×4 keypad Arduino code – Serial monitor
//Code for a 4x4 Keypad
#include <Keypad.h>
const byte ROWS = 4;
const byte COLS = 4;
//Assign key values in 4x4 matrix
char keys[ROWS][COLS] = {
  {'1','2','3','A'},
  {'4','5','6','B'},
  {'7','8','9','C'},
  {'*','0','#','D'}
};
//connect to the row pinouts of the keypad
byte rowPins[ROWS] = {2, 3, 4, 5}; //R1,R2,R3,R4
//connect to the column pinouts of the keypad
byte colPins[COLS] = {6, 7, 8, 9};//C1,C2,C3,C4

Keypad keypad = Keypad( makeKeymap(keys), rowPins, colPins, ROWS, COLS );

void setup(){
  Serial.begin(9600);
}

void loop(){
  char key = keypad.getKey();
  if (key){
    Serial.print(key);
    Serial.print(" ");
  }
}
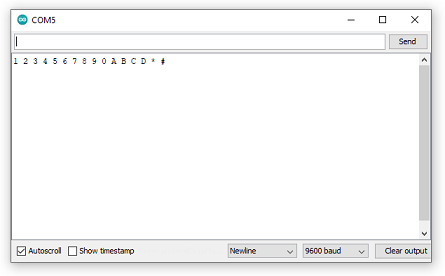
Display on serial monitor
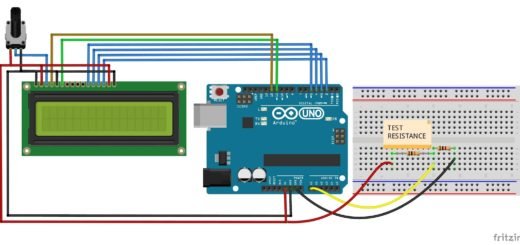
Arduino 4×4 keypad and LCD display
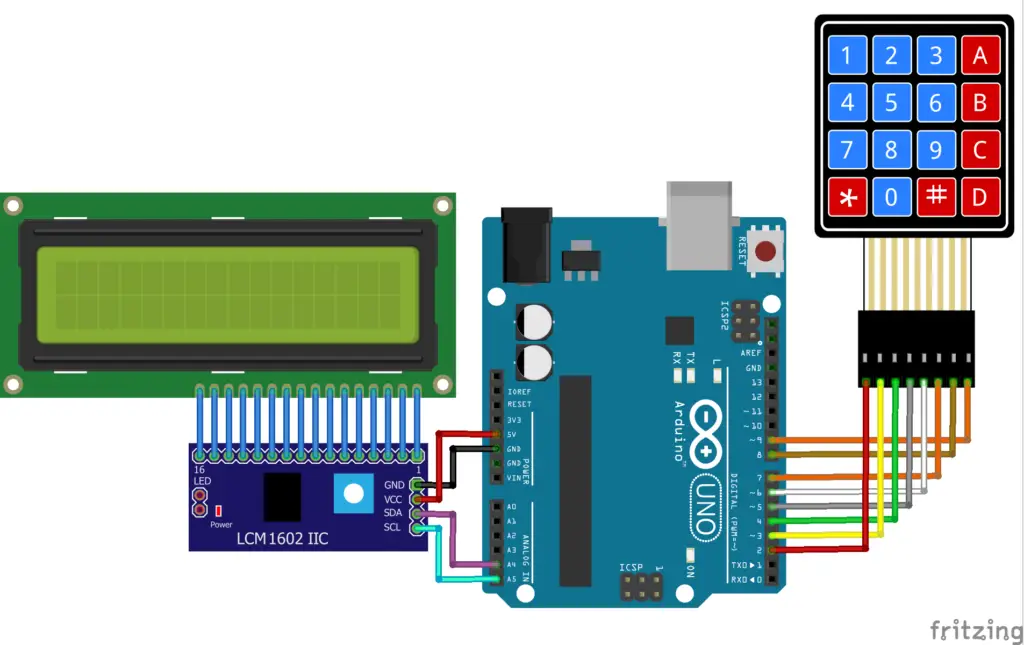
This code and circuit given below is using I2C LCD interface, refer Arduino tutorial for 16×2 LCD display interface with Arduino w/ or w/o I2C adapter.
Arduino code for 4×4 Keypad with 16x2LCD I2C interface
#include <Keypad.h>
#include <LiquidCrystal_I2C.h>
LiquidCrystal_I2C lcd(0x27,16,2);

const byte ROWS = 4;
const byte COLS = 4;

char keys[ROWS][COLS] = {
  {'1','2','3','A'},
  {'4','5','6','B'},
  {'7','8','9','C'},
  {'*','0','#','D'}
};

byte rowPins[ROWS] = {4, 5, 6, 7}; //R1,R2,R3,R4
//connect to the column pinouts of the keypad
byte colPins[COLS] = {8, 9, 10, 11};//C1,C2,C3,C4

Keypad keypad = Keypad( makeKeymap(keys), rowPins, colPins, ROWS, COLS );

void setup(){
  lcd.init();
  lcd.backlight();
  lcd.setCursor(0,0);
}

void loop(){
  char key = keypad.getKey();
  if (key){
  lcd.print(key);
  }
}
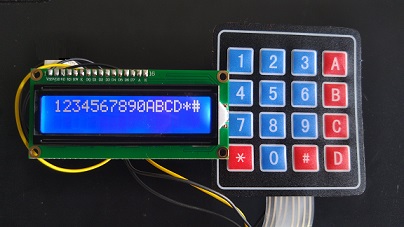
Display on LCD