Get PC system time and internet web API time to Arduino using Processing
This project shows a simple method to obtain the current time on Arduino with the help of processing, it is very useful for many projects like timers, alarms, real-time operations, etc. Also, this method is useful to set or update the time of an RTC or any other digital clock or timer more accurately. Here, using processing the time is read from Desktop PC/Computer system or any webserver API and it is sent to the Arduino via serial communication.
Read Time from PC or system
Processing has inbuilt functions like an hour(), minute(), month(), year(), etc which communicates with the clock on the computer and then returns the current value.
Refer: Processing Input | Time Date
In the below code, the time and date values are assigned to an array “time[]”.
Processing code-1
void draw(){
  int time[]={hour(),minute(),second(),day(),month(),year()};
  // Print time on processing console in the format 00 : 00 : 00
  println(nf(time[0],2) + " : " + nf(time[1],2) + " : "+ nf(time[2],2));
  // Print Date as DD/MM/YYYY
  println(time[3] + "/" + time[4] + "/"+ time[5]);
  delay(500);
}
Get Time from web API
Processing can load data from web API or any file location. In the below code the processing is loading JSON data from the specified URL address, which is a simple web service called WorldTimeAPI that returns the current local time for a given timezone.
The address “http://worldtimeapi.org/api/timezone/Asia/Kolkata” loads the JSON data for the timezone “Asia/Kolkata” (just replace it with any other timezone required); visit the address at http://worldtimeapi.org/api/timezone to view all the available time zones. The data can be also obtained as plain text from worldtimeapi.
Processing code-2
void draw() {
  JSONObject json;
  //use url of JSON data.
  json = loadJSONObject("http://worldtimeapi.org/api/timezone/Asia/Kolkata");
  // above json file has the time value at name "datetime".
  String times = json.getString("datetime");
  println(times);
  delay(500);
}
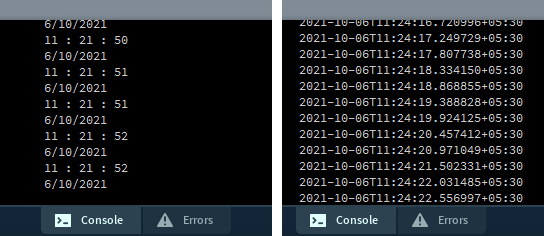
Code-1 output(Left), Code-2 output(Right)
Send Time value from Processing to Arduino as serial data
Here the time value in the processing is sent to Arduino as serial data and for testing, it is displaying on an LCD screen connected to the Arduino.
Refer: Send Data from Processing to Arduino
The time value can be obtained from the webserver API or PC and it can be sent to the Arduino as a string or an int array. In the below processing code, it is using the PC time(Processing code-1) and sending the value as an int array. The advantage of using an int array is the values of the hour, minute, seconds, and date can be simply assigned to variables. Hence it will be easy to use for further calculations or operations. Otherwise, the time data in the string or char array data type needs to be converted to numeric data types.
In code-2, it returns the values as a string. so it requires splitting each parameter value separately and converted as integers.
Processing code
import processing.serial.*;
Serial port;
void setup()
{
  printArray(Serial.list());
  port = new Serial(this,Serial.list()[0], 9600);
}

void draw() {
  //Array time[] => time[0]->hours | time[1]->minutes | time[0]->seconds
  int time[]={hour(), minute(), second()};
  for (int n = 0; n <= 2; n++) {
        port.write(time[n]);
    }
  delay(500);
}
The below code is given for a 16×2 LCD display interface using an I2C adapter; refer to Arduino LCD interface for a brief tutorial on connecting an LCD module to Arduino with or without an I2C adapter.
Arduino code
#include <LiquidCrystal_I2C.h>
LiquidCrystal_I2C lcd(0x27, 16, 2); //16x2 display

int Time[3];
void setup()
{
  lcd.init();// initialize the lcd
  lcd.backlight();// Backlight ON
  Serial.begin(9600);
}

void loop()
{
  while (Serial.available() > 0) {
    lcd.setCursor(0, 0);
    for (int n = 0; n <= 2; n++) {
      Time[n] = Serial.read();
      if (Time[n] < 10) {
        lcd.print("0");// Add 0 prefix if value less than 10.
        //If Time[n] == 1, then displays 01 instead of 1.
      }
      lcd.print(Time[n]);
      if (n < 2) {
        lcd.print(":");//To add only between hour, minute & second.
      }
    }
  }
  delay(500);
}
Time values in Hours, Minutes, and seconds are available at index 0, 1, and 2 of the int array “Time[]” respectively. These elements can be used for further calculations and functions to obtain various values.
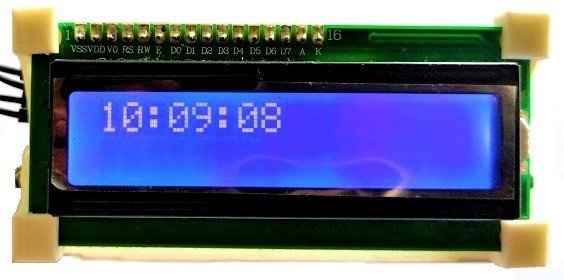
LCD display output result for the above code.