Arduino show Real Time serial data on webpage
This project briefly describes the method to display live Arduino serial data on a webpage using processing code, server & client-side scripts. Here shows the basic working model to display real-time sensor reading which can be accessed publicly over a URL address.
Basic working
SENSOR → ARDUINO → PROCESSING → SERVER → TXT FILE → CLIENT
Sensor: Any transducer module or circuit that can provide an electric signal to Arduino input.
Arduino: Arduino reads the senor input and prints the values as serial data.
Processing: Instead of Arduino serial monitor here use processing code to read the serial data and upload it to the web address as a “get” request.
Server-side: The server-side has the server script to save the values passed via the get request to a TXT file.
TXT file: It stores the recent value with time in simple text format.
Client-side: It runs in the browser of the client. At the specified URL, the recent data saved in the TXT file can be viewed; the page will be updated at regular intervals.
Arduino
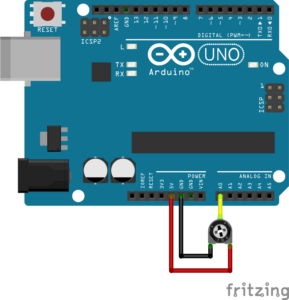
Here the Arduino code reads the sensor input and writes it as serial data. The sensor output will be connected to the analog read pin of the Arduino; the sensor input is a 0-5V DC input voltage
For testing purposes, a set of integers or any data can be used instead of the sensor input values; refer – Save Serial data to a text file – Arduino, Processing, PuTTY.

Arduino code
int value = 0;

void setup() {
  Serial.begin(9600);
}

void loop() {
  value  = analogRead(A0);
  Serial.println(value);
  delay(1000);
}
Processing

The processing read the serial data and send it as a “get” request to an HTTP URL address.
Refer – Upload Arduino serial data to web storage file.
Any additional mathematical or string operations can be performed on the data using the processing code or it can be performed at the later stage in server-side or client scripting languages.
Processing code
import processing.serial.*;
import http.requests.*;

Serial COMPort;  // Create object from Serial class

public void setup()
{
  frameRate(5);
  String portName = Serial.list()[0];
  COMPort = new Serial(this, portName, 9600);
}
void draw() {
  if (COMPort.available() > 0) {  // If data is available,
    String read = trim(COMPort.readString());  // read and store it to string read
    println(read);
    //Replace below address with your file location in host location.
    GetRequest get = new GetRequest("http://example.com/phpscript.php?value=" + read);
    get.send();
    println("Reponse :" + get.getContent());
  }
  delay(500);
}
Server Side
The PHP script reads the get request and saves the value to a text file along with the server time separated by a comma.
Here the text file will be always overwritten by a new value. The data can be also saved as a log by appending every new entry, also any alternate forms like JSON or MySQL database, etc can be used for storing the data.
Here the TXT file will store the data in the format “value, time” that is “value, Hour:Minute:Second AM/PM Day-Month-Year”
Server-side script – PHP
 <?php
if (isset($_GET['value'])) {
 $data= $_GET['value'].",".date("h:i:sA d-m-Y");
 file_put_contents("data.txt", $data);
 echo "saved";
}
?>
Create a file with a .php extension as “phpscript.php” and save the above code in the file directory so that the file is accessible at the URL provided in the processing “getrequest”; in processing code, it is given as “http://example.com/phpscript.php”.
Create a text file and save it with name data.txt; the default data can be store as 00,00:00:00AM 00-00-0000 (optional).
Client-Side
The JS script is used to read the data asynchronously as an AJAX request and HTML to display the data in a web browser.
Create a New file with a .html extension and save the below code.
Markup language & Client side script – HTML & Javascript
<meta charset="UTF-8">
Value: <span id="values">00</span>, <span style="font-size: 12px;color: gray;">Last updated on <span id="time_date">00:00:00 00-00-00</span></span>

<script type="text/javascript">
setInterval(function(){
var xmlhttp = new XMLHttpRequest();
xmlhttp.onreadystatechange = function(){
  if(xmlhttp.status == 200 && xmlhttp.readyState == 4){
	var data = xmlhttp.responseText;
    var value = data.split(',');
	document.getElementById("values").innerHTML = value[0];
	document.getElementById("time_date").innerHTML = value[1];
  }
};
xmlhttp.open("GET","data.txt",true);
xmlhttp.send();
}, 3000);
</script>
The data from the text file in the server location is read every 3 seconds, that is the page will be updated every 3 seconds. It can be modified by changing the time delay in the code. In the above Arduino and processing code, the Arduino print serial data every 1 second and processing delay is 5 milliseconds, so both value also needs to increased or decreased along with the page refresh interval, then only page refresh time makes the difference.
The data in the text file “value” and “time” are separated by a comma. In the below js code, the string is separated at the position of the comma as “value “and “time” and return as HTML content to separate elements with id “values” and “time_date” respectively.
The result or output page can be stylized or designed with additional HTML and CSS codes.