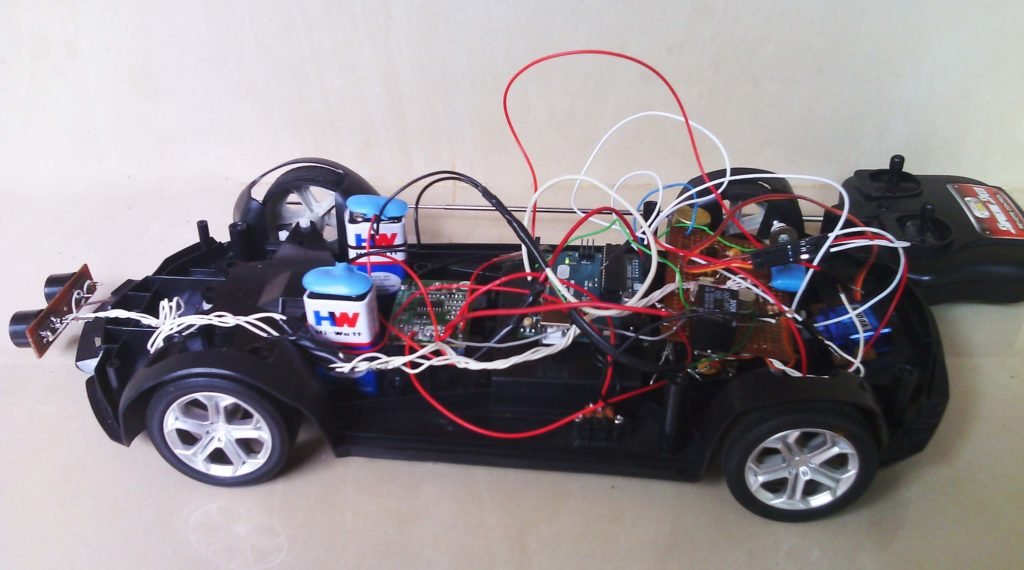
Ultrasonic automatic braking RC car project
Ultrasonic braking is a method of collision avoidance system that can automatically brake the vehicle before an impact. That is whenever any obstruction came in front of the vehicle the system disengages the power transmission to the wheels and activates the braking.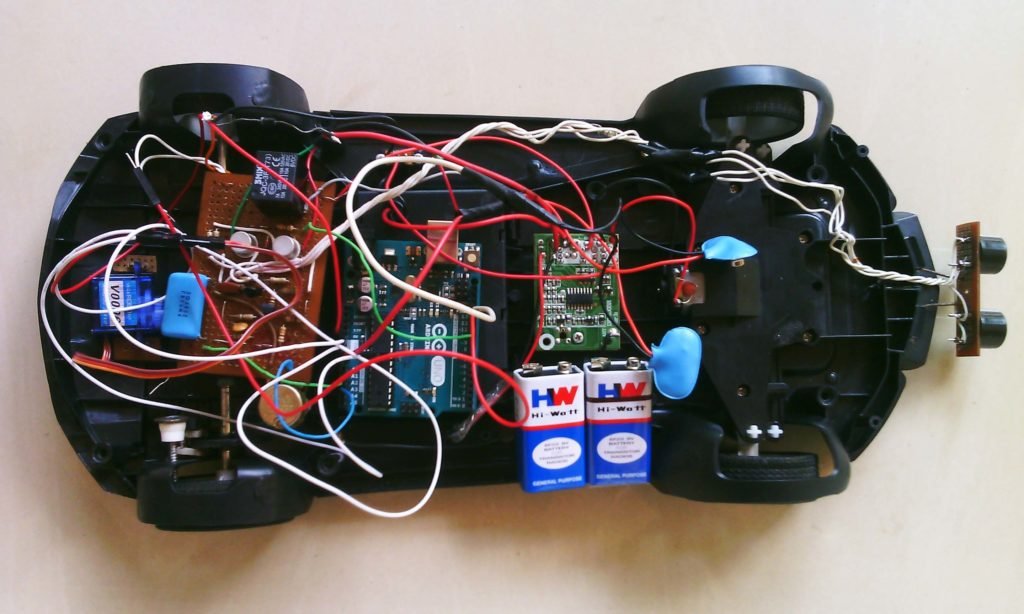
The system works based on the ultrasonic ranging technique which is a non-contact ultrasonic distance measuring method. An ultrasonic braking system consists of an ultrasonic transducer or sensor unit, control unit, and braking mechanism.
The sensor unit consists of a pair of ultrasonic transducers, a transmitter, and a receiver.
The ultrasonic transmitter which is placed in the front of the vehicle will continuously transmit the ultrasonic waves in a fixed range. The transmission transducer generates the ultrasonic waves from a 40khz square wave output generated by the Arduino, which is fed to the transducer after amplification.
An ultrasonic transducer is a component that converts the electrical energy to ultrasonic energy and vice versa; the same transducer can generate and sense the ultrasonic signals.
The ultrasonic receiver which is placed parallel to the transmitter receives the ultrasonic signals that are reflected from the obstacle. Then these reflected waves or signals are fed to the Arduino. The Arduino calculates the distance to the object from the duration of time taken between the transmitted and received waves. Then it checks whether the distance to the object is safe to move forward or the vehicle requires braking. If the distance is less than the safe range then the system will activate the braking.
Refer: » Servo motor interfacing with Arduino
» Arduino Relay module interface
In the here system the Arduino turns the servo motor from an angle of 45 degrees to 0 degrees. And simultaneously it energizes the relay to disconnect the motor supply. The servo arm is mechanically arranged to brake the shaft of the RC car. It is similar to a disc brake arrangement that uses calipers to squeeze the pad against the disc which is attached to the axle. When the obstruction in front of the sensor unit is removed the system returns to the normal state. Then the servo returns back to 45 degrees and the relay to NC (normally closed) position. In the normal state, the vehicle can drive forward without any system interruption.
Without any mechanical arrangements, the braking can be done by electrically also by shorting the motor terminals to brake mode. For advanced project applications, a pneumatic braking mechanism also is used.
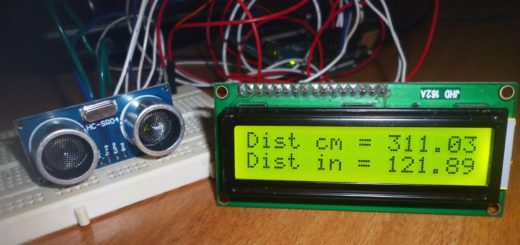
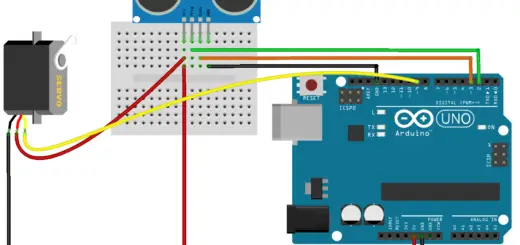
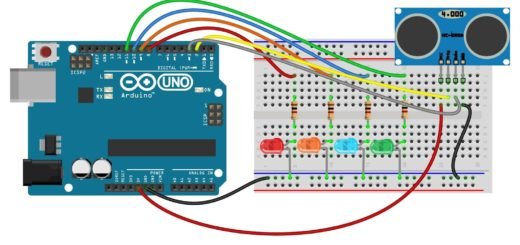
Ultrasonic braking using HC-SR04 module
The above ultrasonic braking system is used with a pair of transducer modules with amplifier circuits. The system can be built with an HC-Sr04 ultrasonic module which is more feasible and provides better accuracy.
Refer to the above link of the non-contact distance measuring for ultrasonic module interface with arduino.

Code
#include <Servo.h>

Servo servo;

const int  trig = 2, echo = 3 , relay  = 7;
int distance = 20, normalpos = 40 , brakepos = 0;
// Minimum distance for braking 20 centimeters.
void setup()
{
  pinMode(trig, OUTPUT);
  pinMode(echo, INPUT);
  pinMode(relay, OUTPUT);
  servo.attach(9);
}

void loop()
{
  if (radar() < distance) {
    servo.write(brakepos);
    // servo shaft angle for apply brake.
    digitalWrite(relay, HIGH);
    // To disconnect motor supply
  }
  else {
    servo.write(normalpos);
    // servo shaft angle for release brake.
    digitalWrite(relay, LOW);
    // To reconnect motor supply
  }
}
long radar(void)
{
  digitalWrite(trig, HIGH);
  delayMicroseconds(15);
  digitalWrite(trig, LOW);
  long  dur = pulseIn(echo, HIGH);
  dur = dur / 58;
  return dur;
}
Hello, does this need any relay? I’m doing a project exactly looks the same as yours but mine is just to make the car (simple toy car) stop if there is an obstacle ahead. Does yours would act the same as mine?
yes, this project is similar and works same as yours. Here the relay is to disconnect the motor supply while applying the brake. The relay charges only if the obstruction is removed.
Do we need to use any motor driver module?
Not necessary, but this can be done with a motor driver too.
Can i get the video to make it
We will upload it soon.
I need the video of how to make it completely with its components list
can i use motor shield instead of relay module
Yes, definitely you can replace the relay with an L293D or similar motor driver modules.
What is the code for L293D
Refer L293D motor driver shield
i want circuit diagram with L293D
L293D motor driver arduino Circuit
Hii.. I am doing a similar type of model which stops when it senses an obstacle using ultrasonic sensor. I am using L298N motor driver module. Can you please help with the necessary arduino code and circuit diagram ?.
Can I get the video?
What relay did you use
A 5V SPST relay. Better to use arduino 5V relay module.
can i get the servo.h code
Actually, the Arduino IDE already comes with the servo.h code.
If it is missing then download servo.h library for arduino from here.
can i get the actual video to make it?
How Can I get the actual video to prepare this module
Hello..my project looks same as yours we are using ultrasonic sensor for measuring distance & whenever the distance is less than a particular distance it should give a warning through a buzzer and if the distance goes beyond that particular distance braking should take place..can u tell us how to apply brakes?
First of all, open the supply to the motors using a switching device.
Then steps to stop the movement of RC car and bring to rest,
1. Small Disc brakes for RC cars are available, you can install that if possible.
2. You have to build a brake mechanism, what I built was a mechanism using a servo motor to squeeze a disc connected to the shaft with two plates separated with spring.
3. Make a switching arrangement to short motor terminals which makes the motor in brake mode.
Hi,
Do you have a photo/diagram that shows the braking mechanism you described? Would like to understand how you use the servo to ‘squeeze’ the brake disc. Thanks.
Just made from scratch.
hello sir , relay is not working properly and only sensor and servo motor is working.Is program need to be modified????? its urgent please help
Normally it works. But you just try adding a time delay between servo write and digital write.
Hi… What is servo in this project and it is nessessery to this project.
Servo is used to operate the disc brake of the RC Car braking mechanism.
Things to use to this model
These are the additional components required to install automatic braking in a functional RC car.
I want a buzzer/alarm to be installed, that will start buzzing before brakes are applied… what necessary changes have to made in the code and the circuitry??
You have to connect a 5V buzzer to any of the digital pins, let’s take for example pin 4.
Then add “digitalWrite(4, HIGH)” inside the if condition just before the servo.write(brakepos).
If you need to start the buzzer a few seconds before the braking. Then you have to add another if condition with a distance value less than braking value. Hence the buzzer starts as soon as the sensor reaches near to the object.
pls uplod project report for this project
Sorry, we don’t have a prepared project report for this one. Because a lot of similar project reports are available on the internet.
Can you list all the electrical component for this project like what type of transistor and resistor and so on?
1) HCSR04 ultrasonic sensor module
2) Relay module
3) Arduino
4) servo
Can we apply this on real cars?
Can we simulate this?
Yes, you can simulate the same concept by using larger devices.
The range of ultrasonic sensor needs to be increased in order to get a safe braking distance. Also hydraulic or pneumatic actuators are required to operate the pedals or cables.
Can u please mention every item you used here please i need it for my school project