Arduino Temperature controller code and working
A temperature controller is a device used to regulate the temperature of an object, space inside a container or room, etc. It works by measuring the ambient temperature using a thermal sensor and controlling the heating or cooling mechanism so as to maintain the set temperature range.
If the ambient temperature is above or below the set temperature it automatically operates the cooling or heating mechanism to bring down or raise the temperature to the desired level.
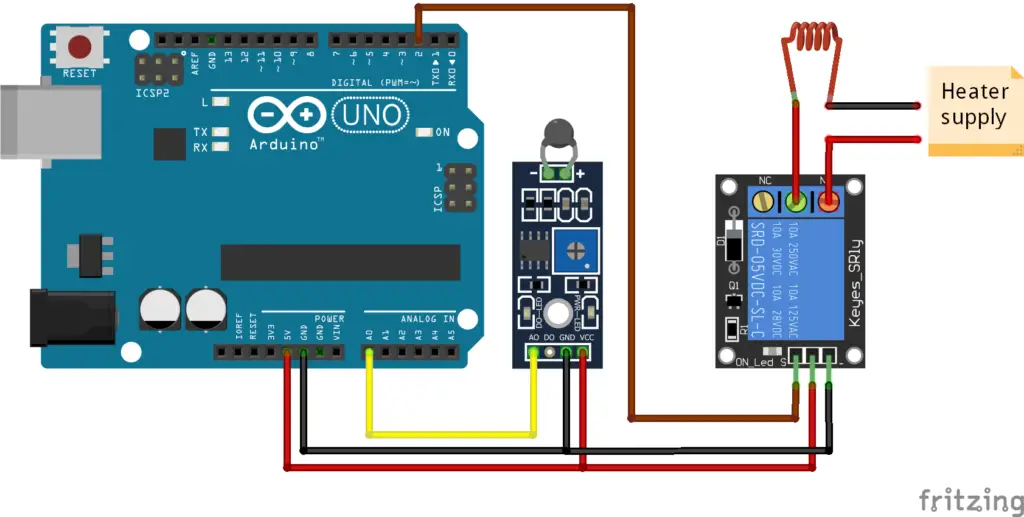
Here an NTC thermistor is used to measure the temperature, refer to Measure temperature using Arduino and NTC thermistor. Both fan and heater are driven using a 5V relay module, the digital pin of the Arduino gives the signal to the relay modules. So any heating or cooling mechanism with an external DC or AC supply can be used in the circuit; make sure the load rating is not exceeding the rating of the relay module.
Heater control (Heating arrangement)
Maintains temperature above the minimum.
This heater control arrangement is useful to maintain the temperature above a particular limit. That is the temperature will be always maintained above the minimum level. The heater remains OFF if the temperature is above the minimum value and it switches ON only when the temperature value drops to the minimum value (In the code, the value of “heater_on_temperature”) then the heater starts and it remains ON until the temperature value reaches a value to the optimum level (“heater_off_temperature”).
This method is useful to maintain a temperature above the ambient temperature because the circuit has only control over the lower limit of temperature. This is useful for egg hatching incubators, water heaters, etc where the temperature always needs to be maintained above the surrounding temperature.
Code
const int heater_out = 2;
int Ro = 50, B =  3950, Rseries = 10;
float To = 298.15;
int heater_on_temperature = 50, heater_off_temperature = 55;

void setup() {
  pinMode(heater_out, OUTPUT);
}

void loop() {
  float Vi = analogRead(A0) * (5.0 / 1023.0);
  float R = (Vi * Rseries) / (5 - Vi);
  float T =  1 / ((1 / To) + ((log(R / Ro)) / B));
  float Tc = T - 273.15;
  // float Tf = Tc * 9.0 / 5.0 + 32.0;
  if (Tc <= heater_on_temperature) {
    //Turn ON heater_out
    digitalWrite(heater_out, HIGH);
  }
  else if (Tc >= heater_off_temperature) {
    //Turn off heater_out
    digitalWrite(heater_out, LOW);
  }
  delay(1000);
}
The temperature values in the above code are in degree celsius “Tc” for Fahrenheit use “Tf” which is commented in the code. Here in the code, the heater ON and heater OFF is at 50°C and 55°C respectively. Hence the heater will be ON for the duration to raise the temperature to 55°C and OFF during the heat dissipation from 55°C to 50°C.
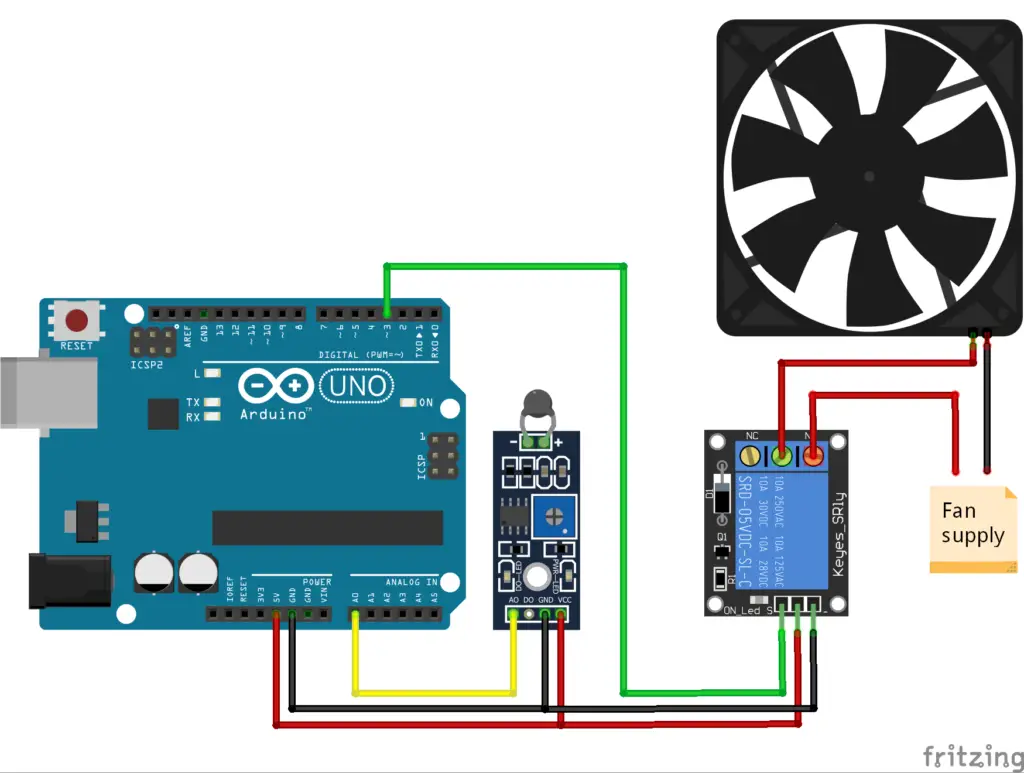
Fan control (Cooling arrangement)
Always keeps the temperature below the maximum.
Fan control is just opposite to the heater. Here the fan tries to limit the temperature from rising above a maximum value.
This type of arrangement is similar in power supplies and devices which have an automatic temperature control fan or cooler that starts when the temperature rises above the limit.
The fan remains off when the temperature is below the maximum limit and turns ON when the temperature reaches above the maximum. It runs until the temperature brought down to the minimum level.
Here it has only control on the upper limit of the temperature value. So, it useful for devices that heat up above the ambient temperature level.
Code
const int fan = 3;
int Ro = 50, B =  3950, Rseries = 10;
float To = 298.15;
int fan_off_temperature = 28, fan_on_temperature = 32;
void setup() {
  pinMode(fan, OUTPUT);
}

void loop() {
  float Vi = analogRead(A0) * (5.0 / 1023.0);
  float R = (Vi * Rseries) / (5 - Vi);
  float T =  1 / ((1 / To) + ((log(R / Ro)) / B));
  float Tc = T - 273.15;
  if (Tc >= 34) {
    //Turn ON Fan
    digitalWrite(fan, HIGH);
  }
  else if (Tc <= 31) {
    //Turn OFF Fan
    digitalWrite(fan, LOW);
  }
  delay(1000);
Here in the code, the fan OFF temperature is 28°C and ON temperature is 32°C. The heater will be OFF till the temperature reaches 32°C and ON till the temperature value is reduced from 32°C to 28°C.
Heater and fan control
Regulate temperature between the optimum range.
Here device has the combined function of both the above controllers. So it can maintain the temperature at an optimum range by either heating up or cooling down even if the ambient temperature is below or above the set range.

Code
const int heater = 2, fan = 3;
int Ro = 50, B =  3950, Rseries = 10;
float To = 298.15;
int optimum = 25, variation = 2;
void setup() {
  pinMode(heater, OUTPUT);
  pinMode(fan, OUTPUT);
}

void loop() {
  float Vi = analogRead(A0) * (5.0 / 1023.0);
  float R = (Vi * Rseries) / (5 - Vi);
  float T =  1 / ((1 / To) + ((log(R / Ro)) / B));
  float Tc = T - 273.15;
  //For optimum temperature 25 and variation 2.
  //Heater control
  if (Tc <= (optimum - variation)) {
    //Below or equal 23 : heater ON
    digitalWrite(heater, HIGH);
  } else if (Tc >= optimum) {
    //Above or equal to 25 : heater OFF
    digitalWrite(heater, LOW);
  }
  //Fan control
  if (Tc >= (optimum + variation)) {
    //Above or equal to 27 : fan ON
    digitalWrite(fan, HIGH);
  } else if (Tc <= optimum) {
    //Below or equal to 25 : fan OFF
    digitalWrite(fan, LOW);
  }
  delay(1000);
}
Here the device always tries to maintain the temperature at the optimum level. In the code, the optimum value is 25°C and the variation is ±2°C.
Maximum = optimum + variation
Minimum = optimum – variation
(Maximum + minimum)/2 = Optimum
So if the temperature is equal or below 23°C heater ON and OFF when the temperature reaches 25°C. Similarly, if the temperature is above or equal to 27°C the fan turns ON and OFF once the temperature drops to 25°C. So only a variation of ±2°C degree will be allowed from the optimum temperature.
Is it possible to set a temperature range? Like nothing should be done in the range of 10°C-20°C, but if it reaches 5°C it should start heating until 10°C and if it reaches 25°C it should cool until 20°C?
Yes, you can. Just use the same code given for “Regulate temperature between the optimum range” with slight modifications. Using the formula given in the article; (optimum + variation) is the maximum, (optimum – variation) is the minimum, Tc >= optimum (optimum value to turn off heater), Tc <= optimum (optimum value to turn off fan). The optimum value to turn ON heater and OFF fan is the same in that code, but you can use separate temperature values for those functions. Try with changes shown in the below code, with replaced limits of temperature thresholds. // initialize with these values int min_temp = 5, optimum_min_temp= 10, optimum_max_temp=20, max_temp=25; if (Tc <= min_temp) { //Below or equal to 5°C : heater ON digitalWrite(heater, HIGH); } else if (Tc >= optimum_min_temp) {
//Above or equal to 10°C : heater OFF
digitalWrite(heater, LOW);
}
//Fan control
if (Tc >= (max_temp) {
//Above or equal to 25°C : fan ON
digitalWrite(fan, HIGH);
} else if (Tc <= optimum_max_temp) { //Below or equal to 20°C : fan OFF digitalWrite(fan, LOW); }
Can you plzz guide me abouut the components required for making the similar pid controlled temperature regulator using audrino uno.
Plzzz
The objective is to set a temp with keypad, and if the temperature is low then the bulb gets on and if the temp is high then fan should turn on
You can use almost same circuit and code used in the part “Heater and fan control” along with a keypad input to set the temperature value.
Refer keypad interface with Arduino : http://mechatrofice.com/arduino/keypad-interfacing-with-arduino
Additional reference on assigning keypad values to a variable or an integer : http://mechatrofice.com/arduino/servo-control-keypad
could you please specify all the components used in this project?
thank you
Based on given code and circuit,
Apart from above two components, you can use any arduino development board, heater, fan or cooling device.