RF remote controlled robot using ASK module and Arduino
The main part of this robot or RC car is the RF remote controller and the driving mechanism. For the RF remote control, the circuit has a low-cost ASK 433mhz module which is a pair of transmitter and receiver modules. Here in this project the ASK sends and receives data using an Arduino library.
Refer ASK 433Mhz module interface with Arduino using Radiohead library
As both the transmitter and receiver need the Arduino library to communicate, both transmitter and receiver parts require an Arduino board. The given circuit has a UNO board, but any small Arduino boards like pro mini, nano, micro, etc or a standalone ATmega328p microcontroller can also be used to make the device more compact and less expensive.
The driving and direction control mechanism of the RC car is operated by two rear driving motors, whose direction of rotation can be independently controlled by a motor driver. The two front tyres are idle or free driving.
The main advantage of this robot is it can be extended to any additional functionalities by simple modifications in the circuit and code. Since the RF communication is using a data transmission library any additional controlling of motors, lights, etc also can be added. Also, by using an additional pair of ASK TX and RX module the robot can measure and send values like sensor readings, coordinates, acknowledgement message, etc back to a receiver.
Refer Transceiver using ASK and Arduino
Working
The remote control has 2 pair of switches, one pair for forward and the reverse drive, and the other for turning to the left and right directions.
To move the robot in a forward or reverse direction, just need to press either the forward or reverse button alone. To turn left or right in a forward or reverse direction press the left or right buttons along with forward or reverse buttons.
Below images show how the robots move in different directions by the changing rotation of tyres with the corresponding remote inputs.
Forward and reverse movement
The RC robot moves in a forwarding direction when both wheels rotate forward. That is Right wheel rotates clockwise and the left wheel rotates counterclockwise (observing the right motor from the right side and the left motor from the left side).
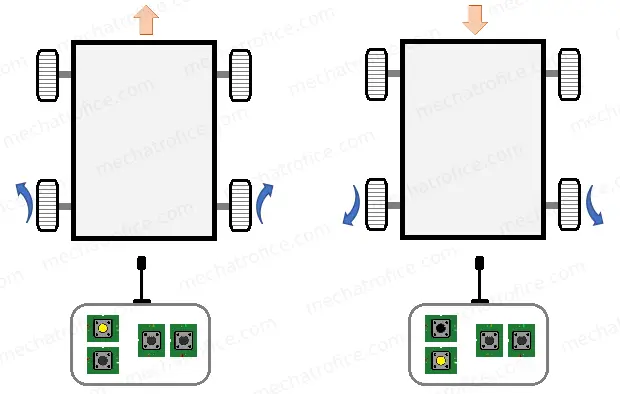
Just opposite of the forward, for reverse movement both wheels rotate backwards, that is the right wheel rotates anti-clockwise and the left motor rotates clockwise.
Right or Left turning
Here turning the robot to right or left in both forward and reverse direction is achieved by stopping the rotation of one of the motors.
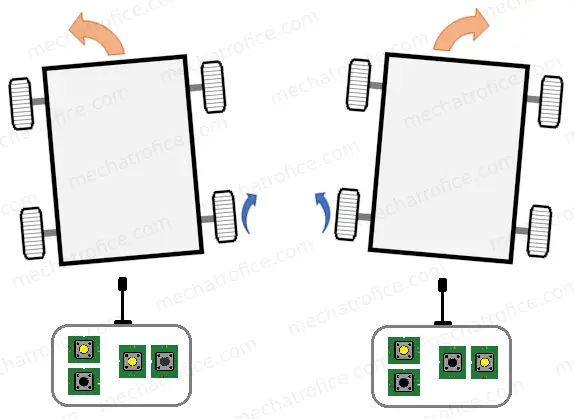
Forward Left – Right wheel rotates forwards or clockwise, left wheel stops.
Forward Right – Left wheel rotates forwards or counterclockwise, right wheel stops.
To turn the RC robot right, the rotation of the right motor is stopped and the left motor is allowed to continue the rotation in the current driving direction. Similarly, to turn left the left wheel stops and the right wheel continues its rotation. This can be applied in both forward and reverse movements. Hence the vehicle can be turned in left and right during both forward and reverse drive.
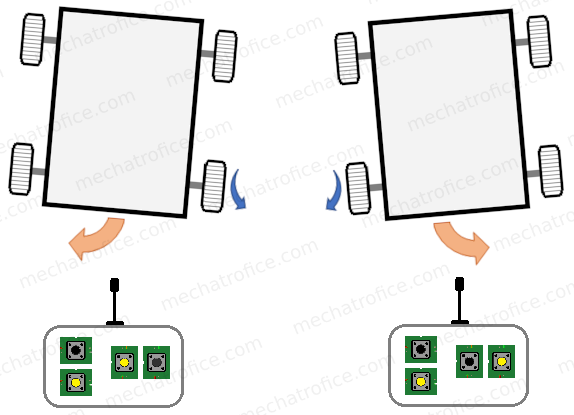
Reverse Left – Right wheel rotates backwards or counterclockwise, left wheel stops.
Reverse Right – Left wheel rotates backwards or clockwise, right wheel stops.
Also, instead of stopping a wheel, the direction can be changed by reducing the speed of the motor or rotating it in the opposite direction.
Transmitter or Remote
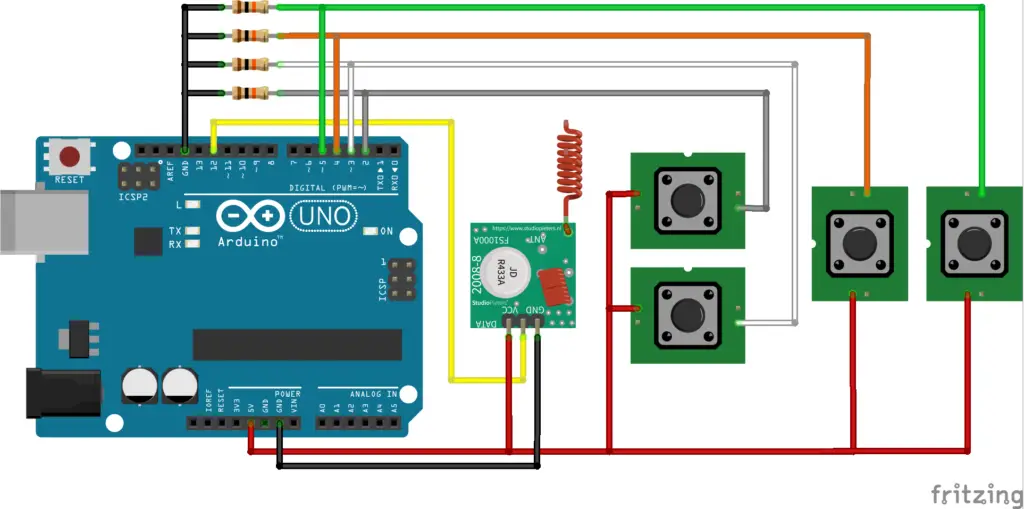
The transmitter circuit mainly has only 4 input switches, an ASK TX module and an Arduino.
Using the Radiohead library the Arduino transmitter part sends respective words or char array to the receiver via ASK module for the corresponding switch input; each word is a message or command for a particular action.
Refer: ASK 433mHZ RF module remote control using Arduino
Tx Code
#include <RH_ASK.h>
#include <SPI.h>

const int forward_switch = 2, reverse_switch = 3, left_switch = 4, right_switch = 5;
int state = 0;
char *msg;
RH_ASK driver;

void setup()
{
  driver.init();
  pinMode(forward_switch, INPUT);
  pinMode(reverse_switch, INPUT);
  pinMode(left_switch, INPUT);
  pinMode(right_switch, INPUT);
}

void loop()
{
  while (digitalRead(forward_switch) == HIGH && digitalRead(left_switch) == LOW
         && digitalRead(right_switch) == LOW) {
    msg = "forward";
    transmit(msg);
  }
  while (digitalRead(reverse_switch) == HIGH  && digitalRead(left_switch) == LOW
         && digitalRead(right_switch) == LOW) {
    msg = "reverse";
    transmit(msg);
  }
  while (digitalRead(forward_switch) == HIGH && digitalRead(left_switch) == HIGH) {
    msg = "forward_left";
    transmit(msg);
  }
  while (digitalRead(forward_switch) == HIGH && digitalRead(right_switch) == HIGH) {
    msg = "forward_right";
    transmit(msg);
  }
  while (digitalRead(reverse_switch) == HIGH && digitalRead(left_switch) == HIGH) {
    msg = "reverse_left";
    transmit(msg);
  }
  while (digitalRead(reverse_switch) == HIGH && digitalRead(right_switch) == HIGH) {
    msg = "reverse_right";
    transmit(msg);
  }
}
void transmit(char* msg) {
  driver.send((uint8_t *)msg, strlen(msg));
  driver.waitPacketSent();
  delay(100);
}
Receiver or RC car/Robot
The receiver part has an Arduino board, ASK receiver, and 2 motors driven by an L293D motor driver.
Refer: L293D motor control using Arduino
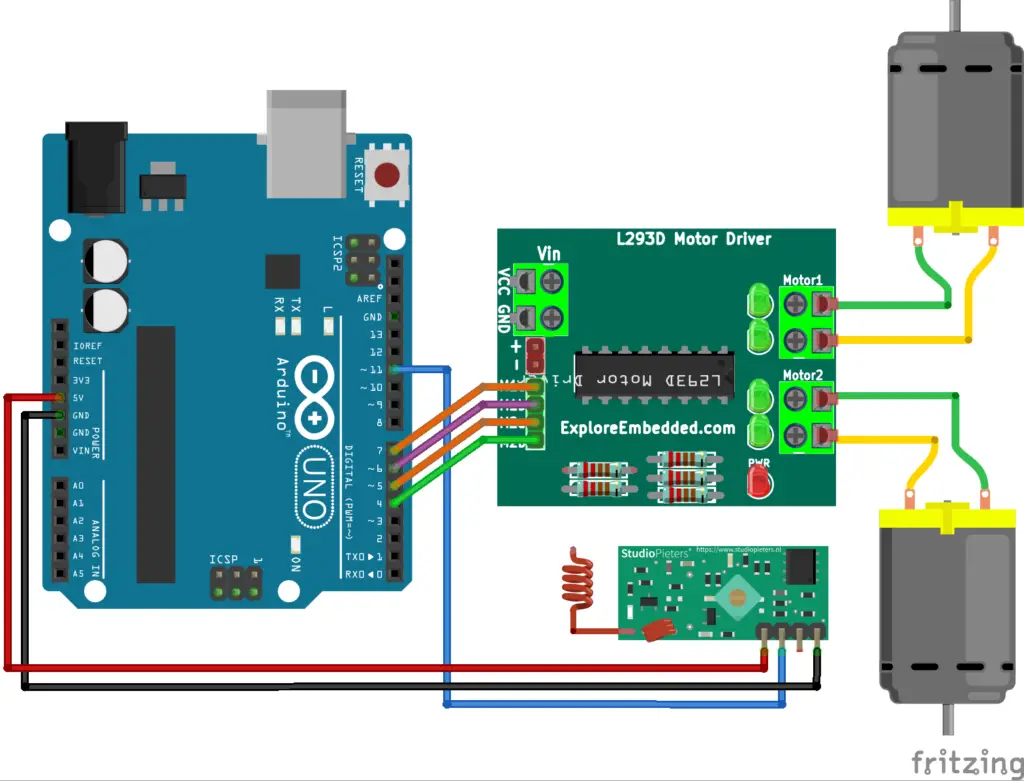
The motor driver needs an external supply to power the motors, which can be connected to the L293D driver.
Rx code
#include <RH_ASK.h>
#include <SPI.h>

RH_ASK driver;
const int motor_1a = 7, motor_1b = 6, motor_2a = 5, motor_2b = 4;
char receive[32];
unsigned long last = 0;

void setup()
{
  driver.init();
  pinMode(motor_1a, OUTPUT);
  pinMode(motor_1b, OUTPUT);
  pinMode(motor_2a, OUTPUT);
  pinMode(motor_2b, OUTPUT);
}

void loop()
{
  uint8_t buf[RH_ASK_MAX_MESSAGE_LEN];
  uint8_t buflen = sizeof(buf);

  if (driver.recv(buf, &buflen))
  {
    last = millis();
    memset(receive, 0, sizeof(receive));
    for (int i = 0; i < buflen; i++) {
      receive[i] = buf[i];
    }
    if (strcmp(receive, "forward") == 0) {
      forward();
    }
    else if (strcmp(receive, "reverse") == 0) {
      reverse();
    }
    else if (strcmp(receive, "forward_left") == 0) {
      forward_left();
    }
    else if (strcmp(receive, "forward_right") == 0) {
      forward_right();
    }
    else if (strcmp(receive, "reverse_left") == 0) {
      reverse_left();
    }
    else if (strcmp(receive, "reverse_right") == 0) {
      reverse_right();
    }
  }
  if ((millis() - last) > 300) {
    brake();
  }
}

void forward() {
  digitalWrite(motor_1a, HIGH);
  digitalWrite(motor_1b, LOW);
  digitalWrite(motor_2a, HIGH);
  digitalWrite(motor_2b, LOW);
}
void reverse() {
  digitalWrite(motor_1a, LOW);
  digitalWrite(motor_1b, HIGH);
  digitalWrite(motor_2a, LOW);
  digitalWrite(motor_2b, HIGH);
}
void forward_left() {
  digitalWrite(motor_1a, LOW);
  digitalWrite(motor_1b, LOW);
  digitalWrite(motor_2a, HIGH);
  digitalWrite(motor_2b, LOW);
}
void forward_right() {
  digitalWrite(motor_1a, HIGH);
  digitalWrite(motor_1b, LOW);
  digitalWrite(motor_2a, LOW);
  digitalWrite(motor_2b, LOW);
}
void reverse_left() {
  digitalWrite(motor_1a, LOW);
  digitalWrite(motor_1b, LOW);
  digitalWrite(motor_2a, LOW);
  digitalWrite(motor_2b, HIGH);
}
void reverse_right() {
  digitalWrite(motor_1a, LOW);
  digitalWrite(motor_1b, HIGH);
  digitalWrite(motor_2a, LOW);
  digitalWrite(motor_2b, LOW);
}
void brake() {
  digitalWrite(motor_1a, LOW);
  digitalWrite(motor_1b, LOW);
  digitalWrite(motor_2a, LOW);
  digitalWrite(motor_2b, LOW);
}
To connect the Arduino and L293D wires easily, run the digitalwrite state of the pin in the forward function alone to find the direction of rotation. Once the motor input wires are connected to get the forward direction of rotation, then the other rotation also works as in the code.
The movements for different switch combinations can be easily changed by modifying the transmitter and receiver code. In the above code, the robot remains rest if the left or right switches are pressed alone without the forward or reverse buttons. But by simple changes in the code, it can be made to rotate in the left or right direction if pressed alone without any forward or reverse movements; by rotating the left and right motors in opposite direction.
For rotating clockwise or towards the right – Turn both the right side and left side motors in an anti-clockwise direction; right side backwards and left side forwards.
For rotating anti-clockwise or towards left – Turn both the right side and left side motors in a clockwise direction; right side forwards and left side backwards.
Also, this robot can be easily modified with a steering controlled mechanism using a servo or other front motor mechanisms with a rear single motor for forward and reverse drive.