Arduino toggle push power on off latch switch
A push power ON-OFF switch is a push-to-make, push-to-break switch which alternates its output between the two output states for repeated push action. That is each time the button is pressed the output turns ON if it is presently OFF and OFF if it is ON.
In the here circuit the Arduino changes its output for each positive edge triggering at the input pin; the transition of the state from LOW to HIGH is called a Positive edge. A positive transition occurs only at the instant when the switch in a released state is been pressed. So holding the switch makes no difference in the output, to change the output the switch has to release and press again.
For every trigger pulse or positive edge the arduino will toggle the state and hold it till the next pulse is received.
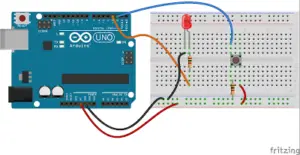
Below given is a sample code to ON and OFF LED with a push-button. The digital pin 2 is taken as the input pin connected with a pull-down resistor to avoid any false triggerings.
The circuit can be modified to operate with high power loads with the same arrangement by just replacing the LED with a relay circuit. Then 230V/110V AC loads or similar loads with external supply can be controlled by the circuit. Refer : Relay interface with the Arduino.
Arduino toggle switch code
Code 1
const int Switch = 2, LED = 3;
int state = 0, LEDstate=0;

void setup()
{
  pinMode(Switch, INPUT);
  pinMode(LED, OUTPUT);
  Serial.begin(9600);
}
void loop()
{
  if (state == 0 && digitalRead(Switch) == HIGH) {
    state = 1;
    LEDstate=!LEDstate;
  }
  if (state == 1 && digitalRead(Switch) == LOW) {
    state = 0;
  }
   digitalWrite(LED, LEDstate);
}
To run additional codes or to operate devices or modules with the latching switch use the below code. Place the required code in the code block space shown in the code. The ”Else” state is true by default, thus the code placed inside it runs first. The ”if” condition becomes true only on the first pulse. Then the execution of code blocks toggles for the next successive actions.
code 2
const int Switch = 2;
int state = 0, Loadstate=0;

void setup()
{
  pinMode(Switch, INPUT);
}
void loop()
{
  if (state == 0 && digitalRead(Switch) == HIGH) {
    state = 1;
    Loadstate=!Loadstate;
  }
  if (state == 1 && digitalRead(Switch) == LOW) {
    state = 0;
  }
   if (Loadstate==HIGH){
    // Add Code block
   }
   else{
    //Add Code block
   }
}
when I tried it, it did not work for me
Could you explain more about the issue?
How to modify code : closed switch moves servo to given angle; open switch moves servo back.
This code will move the servo to the given angle when the switch is closed and move it back to the initial position when the switch is opened.
void loop() {
switchState = digitalRead(switchPin); // read the state of the switch
if (switchState == HIGH) { // if switch is closed
pos = 90; // change position to 90 degrees
} else { // if switch is open
pos = 0; // change position back to 0 degrees
}
myservo.write(pos); // tell servo to go to position in variable ‘pos’
delay(15); // waits 15ms for the servo to reach the position
}
Refer for servo setup and initialization: http://mechatrofice.com/arduino/servo-motor
http://mechatrofice.com/arduino/servo-motor-push-button-control
Works great for me!
I have a homemade midi footswitch with five guitar-pedal type buttons, each with an LED. I ran this against just one button & led and sent the value of digitalRead(Switch) and LEDstate out to serial monitor so I could see how they changed when I pressed the button.
const int Switch = 2, LED = 10;
int state = 0, LEDstate=0;
void setup()
{
pinMode(Switch, INPUT_PULLUP);
pinMode(LED, OUTPUT);
Serial.begin(9600);
}
void loop()
{
if (state == 0 && digitalRead(Switch) == HIGH) {
state = 1;
LEDstate=!LEDstate;
}
if (state == 1 && digitalRead(Switch) == LOW) {
state = 0;
}
digitalWrite(LED, LEDstate);
Serial.print(“LEDstate = “);
Serial.print(LEDstate);
Serial.print(” digReadSwitch = “);
Serial.println(digitalRead(Switch));
}
/*
* This works!
At beginning, without touching button, Ledstate = 1 (on), digReadSwitch = 1
One quick press and Ledstate = 0 (off) and digReadSwitch = 1 (because I’m not pressing it)
Another quick press and Ledstate = 1 (on) again, digReadSwitch = 1
Press and HOLD gives 0,0 : Ledstate = 0 (off) and digReadSwitch = 0
*/
Nice work, Congrats.
So thanks very much!
Do my apologize for my limited knowlage about this subject.Really,very useful for learning and practice school.Thank’s for your time..
Works fabulous!
Thank you very much.