How to make Ultrasonic Water Level Indicator Arduino
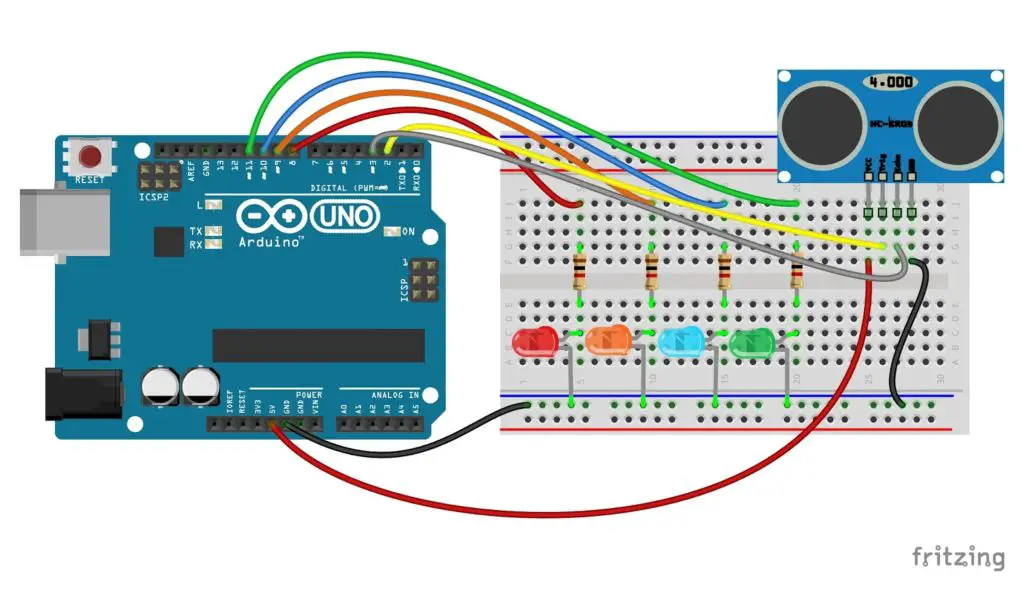
Ultrasonic water level indicator mainly consists of an HC-SR04 ultrasonic module, which is used for non-contact distance readings. Ultrasonic water level sensing is a non-contact level measurement technique.
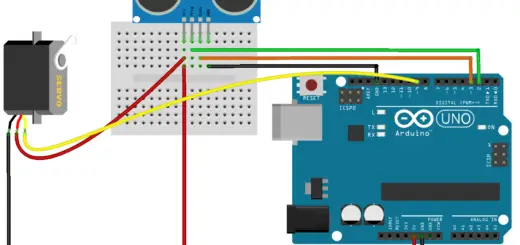
For measuring water level, place the ultrasonic module on top of a tank vertically downwards, so as to face the transducer towards the water.
When the wave travels from the medium of air to water, the majority of the transmitted ultrasonic waves get reflected back to the module. By calculating the travel time of waves to the water surface, the Arduino converts the module output to corresponding length units in centimeter.
- HC-SR04 Ultrasonic sensor interfacing & distance measuring using Arduino
In the program, the distance values are adjusted for a water tank of 1 meter height. The 1 meter height is divided into 3 reference levels of water at a quarter, half, and three-quarter depth of the tank (taken in centimeters).
The ultrasonic module is placed 20cm above the maximum water level. Thus a 20cm is subtracted from the measured distance value. For water below the quarter level, only LED at pin 8 will be ON. And the LEDs on pins 9,10,11 get ON, as the water level crosses the quarter, half, and three-quarter heights respectively.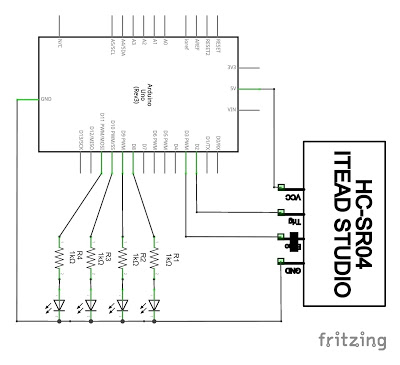
Code
const int trig = 2, echo = 3;
long duration, Distanceincm;
void setup() {
  pinMode(trig, OUTPUT);
  pinMode(echo, INPUT);
  pinMode(11, OUTPUT);
  pinMode(10, OUTPUT);
  pinMode(9, OUTPUT);
  pinMode(8, OUTPUT);
  digitalWrite(8, HIGH);
}

void loop() {
  digitalWrite(trig, HIGH);
  delay(15);
  digitalWrite(trig, LOW);
  duration = pulseIn(echo, HIGH);
  // The ultrasonic module is placed 20cm above from 1m tank.
  Distanceincm = (duration / 58) - 20;
  if (Distanceincm < 25) {  // Above three quarter
    digitalWrite(11, HIGH);
  }
  else {
    digitalWrite(11, LOW);  // Below three quarter
  }
  //
  if (Distanceincm < 50) {  // Above half level
    digitalWrite(10, HIGH);
  }
  else {
    digitalWrite(10, LOW);  // Below half level
  }
  if (Distanceincm < 75) {
    digitalWrite(9, HIGH);  // Above quarter level
  }
  else {
    digitalWrite(9, LOW);   // Below quarter level
  }
  //Below quarter level, only LED at pin 8 will be ON.
}
Hola:
Estoy buscando un sensor de nivel ultrasónico que trabaje con una alimentación de 12 – 30 V AC.
Simplemente use un circuito rectificador con regulador de voltaje para convertir la entrada AC a 12VDC o 5V DC. Y luego conectar a arduino.
I am working on a similar project, i use a float sensor but it is daunting. Can you send me a link to the video using ultrasonic sensor. Does the ultrasound wave reflects back or penetrate water since water is not a rigid body
Most of the signal will reflect back to the sensor due to the difference in the density of the mediums.
i make it but it not work all led is on idk why
Use the basic HCSR04 code (http://mechatrofice.com/arduino/ultrasonic-distance-measurement) and check the distance values you are getting. If you are getting correct values in centimeters then most probably the circuit works.
Also, the values in the code are given for a 1-meter tank, you have to adjust the values in the code with respect to your tank depth.
admin now i made how will it work