Serial communication between Arduino and Processing
Processing is an open-source graphical library and IDE tool built for visual arts with computer programming.
 The processing tool can be used for a variety of applications like visual designing, interactive interfaces, animation, etc. The serial communication functions between a PC desktop/Computer and various microcontrollers like Arduino boards, etc are just one of the very useful applications of processing.
This article briefly describes the serial communication between processing and Arduino boards. The processing has many applications using Arduino serial communication, like obtaining time, sending or receiving HTTP requests, exporting or importing data, managing files, graphical or visual representation of data, UI control, etc.
Read or Write data between Processing and Arduino
Processing to Arduino
Here the processing writes the serial data and the Arduino reads it.
In the below code, the processing code generates a button on the output window. Whenever the mouse pointer is placed over that button processing writes character ‘H’ to the serial port and it changes the button color to GREEN and the text to “ON”. At the same time, when the Arduino reads an incoming serial data as character ‘H’ it turns ON the LED at digital pin 13 (LED builtin).
Similarly, on removing the pointer out of the button processing writes character ‘L’, then the LED on the Arduino turns OFF on when it receives character ‘L’ and in the window, the button color changes to RED and the text to “OFF”.
Mouse controlled LED – Processing code
import processing.serial.*;

Serial port;

void setup() {
  String portName = Serial.list()[0];
  port = new Serial(this, portName, 9600);
  size(200, 200);
}

void draw() {
  background(255);// Background white
  // create ellipse(x,y,width,height)
  ellipse(100, 100, 50, 50);
  if ( dist( mouseX, mouseY, 100, 100 ) < 25 ) {
    port.write('H');
    fill( 0, 255, 0 );// fill green color
    text("ON", 10, 30);
  } else {
    port.write('L');
    fill( 255, 0, 0 );// fill red color
    text("OFF", 10, 30);
  }
  delay(50);
}
Mouse controlled LED – Arduino code
char state;
void setup() {
  pinMode(13, OUTPUT);
  Serial.begin(9600);
}
void loop() {
  if (Serial.available() > 0) {
    state = Serial.read();
  //  LED ON when
    if (state == 'H') {
      digitalWrite(13, HIGH);
    }
    if (state == 'L') {
      digitalWrite(13, LOW);
    }
  }
  delay(50);
}
Arduino to Processing
It is the same as the above codes, the only difference is here the Arduino writes the serial data and the processing reads it. Serial functions other than read()and write() can also be used in these codes.
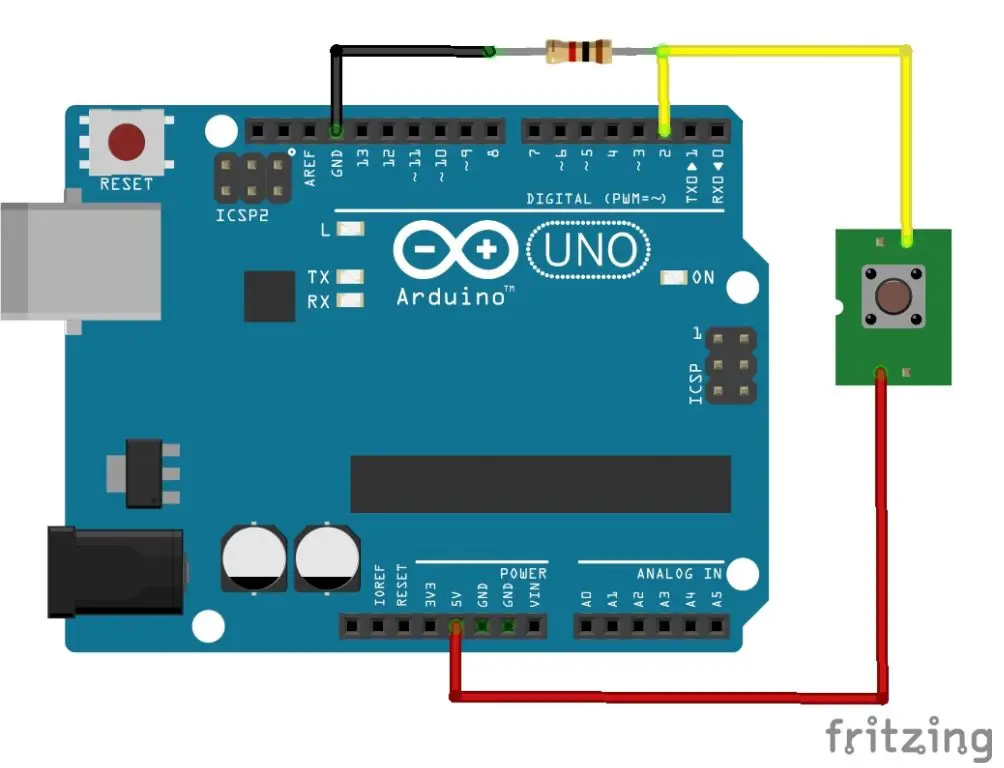
In the below code, the Arduino writes 1 to the serial port when the push button is pressed and writes 0 if it is released.
The push-button is connected to the Pin 2 of the Arduino as shown in the below circuit.
In the processing code, it reads the serial data and builds a visual indication of HIGH and LOW states.
Arduino Read input state code
int inputPin = 2; // Switch connected to pin 2

void setup() {
  pinMode(inputPin, INPUT);
  Serial.begin(9600); // Start serial communication at 9600 bps
}

void loop() {
  if (digitalRead(inputPin) == HIGH) {  // If switch is ON,
    Serial.write(1); // send 1 to Processing
  } else { // If the switch is not ON,
    Serial.write(0); // send 0 to Processing
  }
  delay(100); // Wait 100 milliseconds
}
Processing display input state code
import processing.serial.*;

Serial serialport;  // Create object from Serial class
int val; // int to store serial data

void setup() {
  size(640, 360);
  String portName = Serial.list()[0];
  serialport = new Serial(this, portName, 9600);
  fill(0, 0, 100);
}

void draw() {
  if ( serialport.available() > 0) {  // If data is available,
    val = serialport.read();  // read it and store it in val
  }
  if (val == 1) { //when switch is pressed
    //HIGH state
    background(255);
    line(0, 200, 640, 200);
    rect(300, 100, 50, 100);
    text("HIGH", 100, 100);
  } else { // switch is released
    // LOW state
    background(255);
    line(0, 200, 640, 200);
    rect(300, 190, 50, 10);
    text("LOW", 100, 100);
  }
}

Processing Output (Switch Pressed – HIGH, Switch Released – LOW)
Arduino and Processing communication with or without Firmata
Serial Communication between the Arduino and processing can be performed with the firmata or without firmata.
Without a firmata, the Arduino and processing will just communicate with each other and the processing will not have any Arduino control instructions. In programming without firmata, programs need to be written for both Arduino and Processing. Only serial communication will be performed between the Arduino and processing.
The above Arduino and processing codes are without firmata.
Using Firmata
Using firmata the Arduino board can be controlled by the processing itself by using an Arduino library. We only have to just upload the Firmata sketch to the Arduino board. The further programs for operation and functions will be written within the processing itself.
To Upload Firmata : Open File(In arduino IDE) –> Examples –> Firmata –> StandardFirmata sketch — > Upload
Advantages of using this method are, we can overcome many limitations of Arduino such as,
We can ignore the size limit; any complex or large-sized programs can be written in processing since no additional sketch need to be uploaded to the Arduino. For any programs of any file size, only a firmata of fixed size is needed to be uploaded.
We can run a number of programs without uploading to the Arduino, as the Arduino is controlled by the processing tool. For any program, we just need to upload the firmata once. Further programming and Run can be done without upload. So we can perform trial and error on the program without uploading the Arduino sketch each time. For projects with frequent changes and modifications, Arduino + Processing with Firmata is most effective. Because instantaneous outputs can be obtained by just playing and stopping.
Note: The baud rate is 57600 while using with firmata .
Processing Code
//LED Blink - Processing.
import processing.serial.*;
import cc.arduino.*;

Arduino arduino;
int ledPin = 13;

void setup()
{
  //print the available serial ports.
  printArray(Serial.list());
  //Select port from the listed array.
  //replace [0] to [1],[2]...for selecting a usable open port.
  arduino = new Arduino(this, Serial.list()[0], 57600);
  arduino.pinMode(ledPin, Arduino.OUTPUT);
}

void draw()
{
  arduino.digitalWrite(ledPin, Arduino.HIGH);
  delay(1000);
  arduino.digitalWrite(ledPin, Arduino.LOW);
  delay(1000);
}
 The world of hobby 3D printing: Can non-techies make it?
 Solving any problems: Apply this simple technique
 How to overcome Laziness: The Japanese Kaizen 1 minute method
 5 simple Tips to fall asleep early at night