HMC5883L Arduino Compass Tutorial
HMC5883L 3-Axis Compass Module Arduino interface
The compass module consists of an HMC5883L three-axis (Cartesian axes x, y, and z) magnetic field chip which consists of 3 magneto-resistive sensors arranged in axes perpendicular to each other.
Magneto-resistive sensors work by the Magneto-resistance property of a material. That is, the ability to change its value of electrical resistance with respect to the applied external magnetic field. Thus it can generate a differential output in relation to the intensity of the incident magnetic field in the sensitive axis directions. Hence an HMC5883L 3-Axis module can also be used to measure the magnetic field.
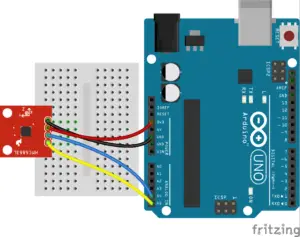
HMC5883L module Arduino pin connection
| Arduino Pin | HMC5883L pin |
| 3.3V | VCC |
| GND | GND |
| Analog input pin A4 | SDA (Serial Data – I2C Master/Slave Data) |
| Analog input pin A5 | SCL (Serial Clock – I2C Master/Slave Clock) |
The hmc5883l module uses a communication standard of IIC or 12C (Inter-Integrated Circuit) protocol.
DRDY (Data Ready) is an optional connection and so it is not used in the circuit.

To run programs with this module arduino Library for HMC5883L is required to be installed, here we are using an Adafruit Sensor framework library.
Download a Library file for Sensor and HMC5883. Then extract it to your library folder in your Arduino installation,
Or add the ZIP file by, Sketch –> Include Library –> Add.ZIP Library.
True bearing arduino digital compass
The true bearing compass is the most commonly used type of compass, which measures the bearing to a point by an angle measured in degrees from the north in a clockwise direction. The true bearing is referred to as True North-based azimuths or the bearing. The compass shows heading degree measurements from 0° to 360°. The four cardinal points of the compass are North – 0° or 360°, East – 90°, South – 180°, and West – 270° in a clockwise direction. The reference plane for an azimuth will be true north at a 0° azimuth.
Here the 0° to 360° angular measurement will be in the direction of the x-axis of the module with the north point. The direction of the axes with respect to the module position is labeled in the module.
Hmc5883l heading code
#include <Wire.h>
#include <Adafruit_Sensor.h>
#include <Adafruit_HMC5883_U.h>

Adafruit_HMC5883_Unified mag = Adafruit_HMC5883_Unified(12345);

void setup(void)
{
  Serial.begin(9600);
}

void loop()
{
  sensors_event_t event;
  mag.getEvent(&event);
  float heading = atan2(event.magnetic.y, event.magnetic.x);
  float declinationAngle = 0.22;
  heading += declinationAngle;
  if (heading < 0) {
    heading += 2 * PI;
  }
  if (heading > 2 * PI) {
    heading -= 2 * PI;
  }
  float headingDegrees = heading * 180 / M_PI;
  Serial.print("Heading : ");
  Serial.print(headingDegrees);
  Serial.println(" degree");
  delay(500);
}
Conventional bearing Arduino compass
A magnetic compass uses the earth’s magnetic field to determine the directions relative to the cardinal points.
The four cardinal points are north, east, south, and west represented as N, E, S, W directions. In the clockwise direction, the cardinal points are followed in the sequence as North, East, South, and West; with a right angle from one cardinal to another.
The conventional bearing or compass bearing of a point is the angle of degrees east or west from north or south cardinal points.
The intermediate directions between the four cardinal points are northeast (NE), south-east (SE), south-west (SW), and north-west (NW).
The direction of a point in a conventional bearing is denoted as the angle measured in degrees from the north or south point towards the East or West direction.
eg: – true bearing in degrees from 0 to 360 denoted in conventional bearing,
True bearing Conventional bearing
45° N 45° E
100° S 80° E
210° S 30° W
300° N 60° W
The heading of the X-axis of the HMC5883L module obtains the true bearing values from 0° to 360° and is converted to a conventional bearing form, through determining the position of heading direction in the four quadrants from 0° to 360°.
Conventional bearing Arduino compass code
#include <Wire.h>
#include <Adafruit_Sensor.h>
#include <Adafruit_HMC5883_U.h>

Adafruit_HMC5883_Unified mag = Adafruit_HMC5883_Unified(12345);

void setup(void)
{
  Serial.begin(9600);
}

void loop()
{
  sensors_event_t event;
  mag.getEvent(&event);
  float heading = atan2(event.magnetic.y, event.magnetic.x);
  float declinationAngle = 0.22;
  heading += declinationAngle;
  if (heading < 0) {
    heading += 2 * PI;
  }
  if (heading > 2 * PI) {
    heading -= 2 * PI;
  }
  float headingDegrees = heading * 180 / M_PI;
  if (headingDegrees == 0 || headingDegrees == 360 ) {
Serial.println("N");
}
if (headingDegrees > 0 && headingDegrees < 90 ) {
Serial.print("N");
// Degree from north towards east direction
Serial.print(headingDegrees);
Serial.write(176);
Serial.println("E");
}
if (headingDegrees == 90) {
Serial.println("E");
}
if (headingDegrees > 90 && headingDegrees < 180 ) {
// Degree from south towards east direction
headingDegrees = 180 - headingDegrees;
Serial.print("S");
Serial.print(headingDegrees);
Serial.write(176);
Serial.println("E");
}
if (headingDegrees == 180) {
Serial.println("S");
}
if (headingDegrees > 180 && headingDegrees < 270 ) {
// Degree from south towards west direction
headingDegrees = headingDegrees - 180;
Serial.print("S");
Serial.print(headingDegrees);
Serial.write(176);
Serial.println("W");
}
if (headingDegrees == 270) {
Serial.println("W");
}
if (headingDegrees > 270 && headingDegrees < 360 ) {
// Degree from North towards west direction
headingDegrees = 360 - headingDegrees;
Serial.print("N");
Serial.print(headingDegrees);
Serial.write(176);
Serial.println("W");
}
delay(500);
}
Hmc588l compass module raw and scaled axes values
Using this program the serial monitor displays the Magnetic vector values of the magnetic field on three axes (X, Y, and Z axes) in micro-Tesla (uT).
Magnetic vector values code
#include <Wire.h>
#include <Adafruit_Sensor.h>
#include <Adafruit_HMC5883_U.h>

Adafruit_HMC5883_Unified mag = Adafruit_HMC5883_Unified(12345);

void setup()
{
  Serial.begin(9600);
}

void loop(void)
{
  sensors_event_t event;
  mag.getEvent(&event);
  Serial.print("X axis: "); Serial.print(event.magnetic.x); Serial.print(" uT   ");
  Serial.print("Y axis: "); Serial.print(event.magnetic.y); Serial.print(" uT   ");
  Serial.print("Z axis: "); Serial.print(event.magnetic.z); Serial.println(" uT");
  delay(500);
}
 The world of hobby 3D printing: Can non-techies make it?
 Solving any problems: Apply this simple technique
 How to overcome Laziness: The Japanese Kaizen 1 minute method
 5 simple Tips to fall asleep early at night
Can you provide the libraries for this code?
Refer HMC5883L library code.
Hello Sir, I have referred code from your website , on compass code with arduino ,,
#include
#include
#include
Adafruit_HMC5883_Unified mag = Adafruit_HMC5883_Unified(12345);
void setup(void)
{
Serial.begin(9600);
}
void loop()
{
Serial.println(“1”);
sensors_event_t event;
Serial.println(“2”);
mag.getEvent(&event); // <<<<<<<<<<<<<<<<<<<<<<<<<<<<<< AT THIS POINT
Serial.println("3");
float heading = atan2(event.magnetic.y, event.magnetic.x);
float declinationAngle = 0.22;
heading += declinationAngle;
Serial.println("2");
.
.
.
But the see the point I have commented at this point the programs stucks. I have debugged with the print statement so the Serial Monitor gives 1 than 2 and than stuck
Did you have properly installed Adafruit_Sensor.h and Adafruit_HMC5883_U.h library functions?
How do I install Adafruit_Sensor.h and Adafruit_HMC5883_U.h library function? Thank you
Download zip files, then in the Arduino IDE go to Sketch –> Include Library –> Add.ZIP Library
OR sketch > Manage libraries > Search Adafruit_Sensor & Adafruit_HMC5883 libraries > Install.
Hi, I have a problem with sensor results. Actualy there is no problem with sensor setup and codes. But if the sensor moved to vertical line (changed angel) the result is comes different. How can i take fix result? I just want X arrow side compas degree. I need your help. Thank you.
You have to use tilt compensation using 3 axis Accelerometer with the Compass module.
I get the error ‘import’ does not name a type; did you mean ‘qsort’?
How to fix it?
In which IDE you used to run the code, in Arduino IDE or in the Processing IDE?
Upload the Arduino code to the board using Arduino IDE and run the processing code in processing IDE.
Thank you for sharing, I have followed your instructions but until running Processing IDE, my compass did not turn.
And how can this command be modified to run normally?
port_1 = new Serial(this, Serial.list()[1], 9600);
How to determine the port port that I am 0.1,2, or a certain number, on my Arduino is COM4
you can add this line “printArray(Serial.list());” to list all serial ports.
If your Arduino is in COM4 then it is “Serial.list()[3]”.
Hey sir! is it possible to check if there is a wire in the wall with this sensor and is there a diffrent code that i should use to check the change in the magnetic field???
Try using the code for raw magnetic vector values and check the variation of the values of each axis when any magnetic field comes near to the module. Then determine a thresold value which can indicate the presense of a current carrying wire.
If just need any AC detector not specifically using HMC5883L, refer: https://mechatrofice.com/circuits/non-contact-ac-detector-circuit
Sorry I didn’t saw you replied thank you for your help sir!
Hey sir can you help me , I have to measure intensity of magnetic field with this sensor what code should I write what should I change, I got to do this for a school project!
Use the code under the heading “Magnetic vector values code” which gives the magnetic field in each vector x,y,z in micro-Tesla. You can take one of these vectors (for example x-axis) to measure the magnetic field with respect to the direction of the same vector labeled (x-axis) in your HMC5883L sensor.
I wanna know M_PI is what mean in float headingDegrees = heading * 180 / M_PI;
M_PI is defined as the value of pi 3.14. It returns the value of pi in float.
Hello thanks for the tutorial
I have some problems, when tested in Arduino IDE, the output only showed 273.61 deg even though I rotated the sensor, while in the Processing IDE, it returned with
map(NaN, 0, 360, 0, 6.283) called, which returns NaN (not a number)
Was there something that I miss? Thanks